MyBatis应用
# ORM框架的发展历史与MyBatis的高级应用
# 一、ORM框架的发展历程
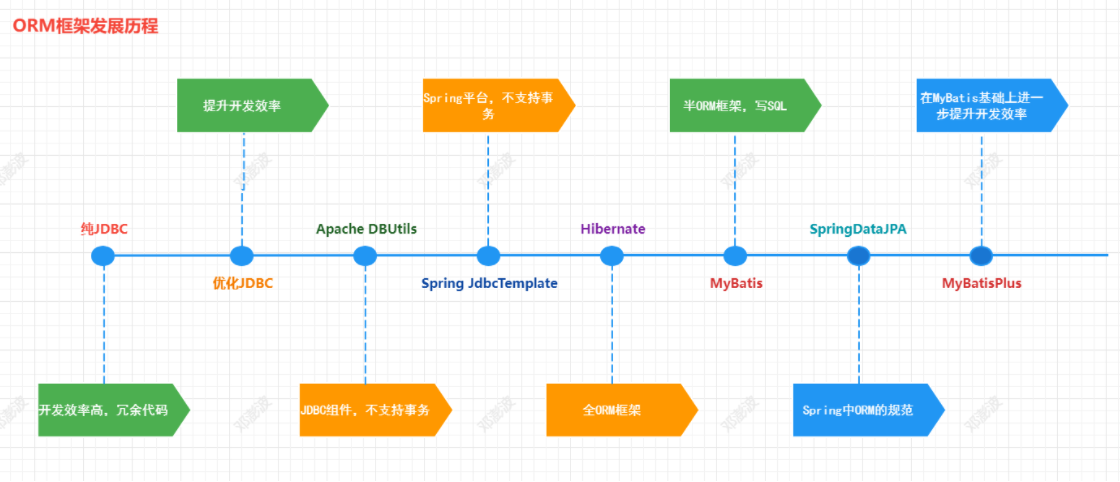
# 1. JDBC操作
操作的特点
JDBC操作数据库的基本用法
依赖
<dependency>
    <groupId>mysql</groupId>
    <artifactId>mysql-connector-java</artifactId>
    <version>8.0.20</version>
</dependency>
2
3
4
5
代码
/**
 * JDBC 基本操作
 */
public class Demo_01_JDBC {

    private static String url = "jdbc:mysql://xx.xxx.22.236:3306/mybatis?useUnicode=true&characterEncoding=UTF-8&useJDBCCompliantTimezoneShift=true&useLegacyDatetimeCode=false&serverTimezone=GMT%2b8";
    private static String username = "root";
    private static String pwd = "xxxxx";


    public static void main(String[] args) throws ClassNotFoundException, SQLException {
        // 注册驱动
        Class.forName("com.mysql.cj.jdbc.Driver");

        // 打开连接
        Connection connection = DriverManager.getConnection(url, username, pwd);

        // 执行SQL
        Statement statement = connection.createStatement();
        String sql = "select * from user";
        ResultSet resultSet = statement.executeQuery(sql);

        // 遍历输出
        while (resultSet.next()) {
            int id = resultSet.getInt("id");
            String username = resultSet.getString("username");
            String age = resultSet.getString("age");

            System.out.println("id:" + id);
            System.out.println("username:" + username);
            System.out.println("age:" + age);
        }
    }
}
2
3
4
5
6
7
8
9
10
11
12
13
14
15
16
17
18
19
20
21
22
23
24
25
26
27
28
29
30
31
32
33
34
具体的操作步骤是,首先在pom.xml中引入MySQL的驱动依赖,注意MySQL数据库的版本
- Class.forName注册驱动
- 获取一个Connection对象
- 创建一个Statement对象
- execute()方法执行SQL语句,获取ResultSet结果集
- 通过ResultSet结果集给POJO的属性赋值
- 最后关闭相关的资源
这种实现方式首先给我们的感觉就是操作步骤比较繁琐,在复杂的业务场景中会更麻烦。尤其是我们需要自己来维护管理资源的连接,如果忘记了,就很可能造成数据库服务连接耗尽。同时我们还能看到具体业务的SQL语句直接在代码中写死耦合性增强。每个连接都会经历这几个步骤,重复代码很多,总结上面的操作的特点:
- 代码重复
- 资源管理
- 结果集处理
- SQL耦合
# 二、MyBatis实际案例
# 1. 环境准备
# 1.1 添加依赖
<dependency>
    <groupId>org.mybatis</groupId>
    <artifactId>mybatis</artifactId>
    <version>3.5.4</version>
</dependency>
<dependency>
    <groupId>mysql</groupId>
    <artifactId>mysql-connector-java</artifactId>
    <version>8.0.20</version>
</dependency>
2
3
4
5
6
7
8
9
10
# 1.2 添加配置文件
目录结构
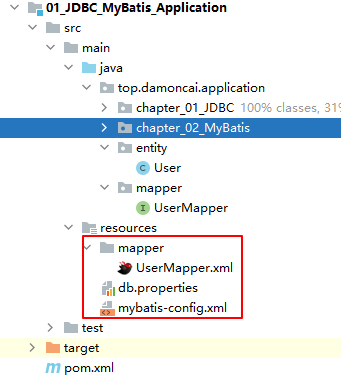
全局配置文件,这里面是对MyBatis的核心行为的控制mybatis-config.xml
<?xml version="1.0" encoding="UTF-8" ?>
<!DOCTYPE configuration PUBLIC "-//mybatis.org//DTD Config 3.0//EN" "http://mybatis.org/dtd/mybatis-3-config.dtd">
<configuration>

    <properties resource="db.properties"></properties>
    <settings>
        <!-- 打印查询语句 -->
        <setting name="logImpl" value="STDOUT_LOGGING" />

        <!-- 控制全局缓存(二级缓存),默认 true-->
        <setting name="cacheEnabled" value="false"/>

        <!-- 延迟加载的全局开关。当开启时,所有关联对象都会延迟加载。默认 false  -->
        <setting name="lazyLoadingEnabled" value="true"/>
        <!-- 当开启时,任何方法的调用都会加载该对象的所有属性。默认 false,可通过select标签的 fetchType来覆盖-->
        <setting name="aggressiveLazyLoading" value="true"/>
        <!--  Mybatis 创建具有延迟加载能力的对象所用到的代理工具,默认JAVASSIST -->
        <!--<setting name="proxyFactory" value="CGLIB" />-->
        <!-- STATEMENT级别的缓存,使一级缓存,只针对当前执行的这一statement有效 -->
        <!--
                <setting name="localCacheScope" value="STATEMENT"/>
        -->
        <setting name="localCacheScope" value="SESSION"/>
    </settings>

    <typeAliases>
        <typeAlias alias="user" type="top.damoncai.application.entity.User" />
    </typeAliases>

    <environments default="development">
        <environment id="development">
            <transactionManager type="JDBC"/><!-- 单独使用时配置成MANAGED没有事务 -->
            <dataSource type="POOLED">
                <property name="driver" value="${jdbc.driver}"/>
                <property name="url" value="${jdbc.url}"/>
                <property name="username" value="${jdbc.username}"/>
                <property name="password" value="${jdbc.password}"/>
            </dataSource>
        </environment>
    </environments>

    <mappers>
        <mapper resource="mapper/UserMapper.xml"/>
    </mappers>

</configuration>
2
3
4
5
6
7
8
9
10
11
12
13
14
15
16
17
18
19
20
21
22
23
24
25
26
27
28
29
30
31
32
33
34
35
36
37
38
39
40
41
42
43
44
45
46
数据库属性的配置文件
jdbc.driver=com.mysql.jdbc.Driver
jdbc.url=jdbc:mysql://localhost:3306/mybatis?characterEncoding=utf-8&serverTimezone=UTC
jdbc.username=root
jdbc.password=123456
2
3
4
xml文件
<?xml version="1.0" encoding="UTF-8"?>
<!DOCTYPE mapper PUBLIC "-//mybatis.org//DTD Mapper 3.0//EN" "http://mybatis.org/dtd/mybatis-3-mapper.dtd">
<mapper namespace="top.damoncai.application.mapper.UserMapper">
    <resultMap id="BaseResultMap" type="user">
        <id property="id" column="id" jdbcType="INTEGER"/>
        <result property="username" column="username" jdbcType="VARCHAR" />
        <result property="age" column="age" jdbcType="VARCHAR" />
    </resultMap>


    <select id="selectList" resultMap="BaseResultMap">
        select * from user
    </select>
</mapper>
2
3
4
5
6
7
8
9
10
11
12
13
14
# 2. 编程式的使用
代码
/**
 * MyBatis 基本操作
 */
public class Demo_01_MyBatis {

    public static void main(String[] args) throws IOException {
        // 1.获取配置文件
        InputStream in = Resources.getResourceAsStream("mybatis-config.xml");
        // 2.加载配置文件。获取SqlSessionFactory对象
        SqlSessionFactory factory = new SqlSessionFactoryBuilder().build(in);
        // 3.根据SqlSessionFactory对象获取SqlSession对象
        SqlSession sqlSession = factory.openSession();
        // 4.通过SqlSession中提供的 API方法来操作数据库
        List<User> users = sqlSession.selectList("top.damoncai.application.mapper.UserMapper.selectList");
        System.out.println(users);
    }
}
2
3
4
5
6
7
8
9
10
11
12
13
14
15
16
17
效果

这种方式其实就是通过SqlSession中给我们提供的相关的API方法来执行对应的CRUD操作,查找我们写的SQL语句是通过 namespace+"."+id的方式实现的
不过,这样的调用方式还是会存在一些问题:
- Statement ID是硬编码,维护起来很不方便;
- 不能在编译时进行类型检查,如果namespace或者Statement ID输错了,只能在运行的时候报错。
所以我们通常会使用第二种方式,也是新版的MyBatis里面推荐的方式:定义一个Mapper接口的方式。这个接口全路径必须跟Mapper.xml里面的namespace对应起来,方法也要跟Statement ID一一对应1
# 3. 代理方式的使用
定义接口
public interface UserMapper {

    List<User> selectList();
}
2
3
4
映射文件
我们通过getMapper的方式来使用的话,我们需要添加对应的映射文件,在映射文件中我们需要将namespace声明为上面接口的全类路径名,同时对应的sql标签的id要和方法名称一致。
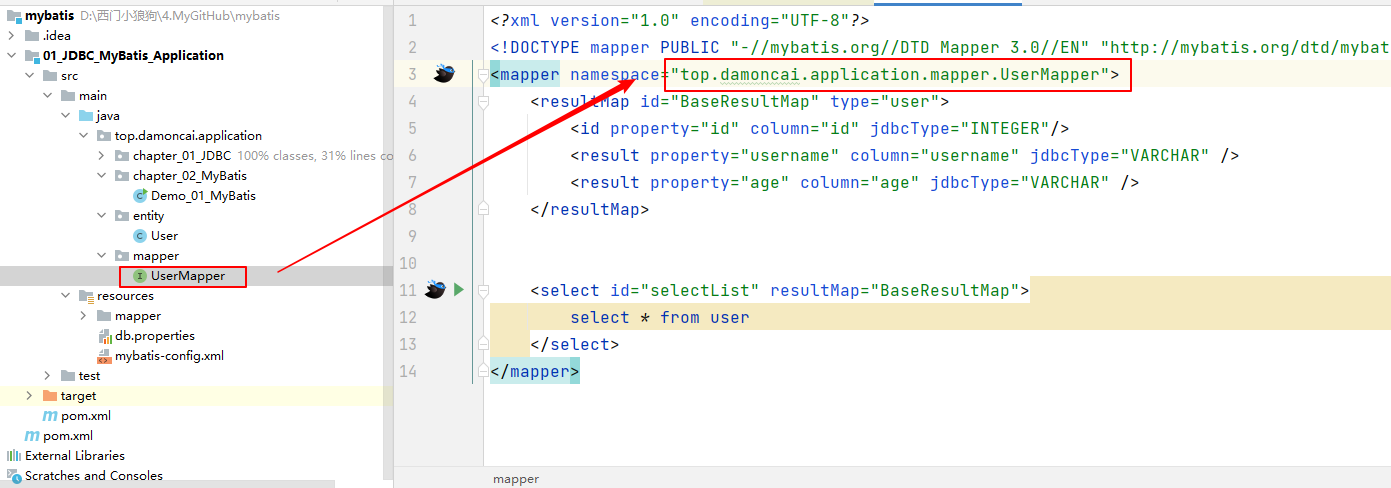
最后我们还有保证映射文件的名称和接口的名称要一致。在文件很多的情况能很好的管理
getMapper
/**
 * MyBatis 基本操作
 */
public class Demo_02_MyBatis_getMapper {

    public static void main(String[] args) throws IOException {
        // 1.获取配置文件
        InputStream in = Resources.getResourceAsStream("mybatis-config.xml");
        // 2.加载配置文件。获取SqlSessionFactory对象
        SqlSessionFactory factory = new SqlSessionFactoryBuilder().build(in);
        // 3.根据SqlSessionFactory对象获取SqlSession对象
        SqlSession sqlSession = factory.openSession();
        // 4.通过SqlSession中提供的 API方法来操作数据库
        UserMapper userMapper = sqlSession.getMapper(UserMapper.class);
        List<User> users = userMapper.selectList();
        System.out.println(users);
    }
}
2
3
4
5
6
7
8
9
10
11
12
13
14
15
16
17
18
最后总结下MyBatis的特点:
- 使用连接池对连接进行管理
- SQL和代码分离,集中管理
- 结果集映射
- 参数映射和动态SQL
- 重复SQL的提取
- 缓存管理
- 插件机制
Hibernate和MyBatis跟DbUtils、Spring JDBC一样,都是对JDBC的一个封装,我们去看源码,最后一定会看到Connection、Statement和ResultSet这些对象。对应的选择
- 在一些业务比较简单的项目中,我们可以使用Hibernate;
- 如果需要更加灵活的SQL,可以使用MyBatis,对于底层的编码,或者性能要求非常高的场合,可以用JDBC;
- 实际上在我们的项目中,MyBatis和Spring JDBC是可以混合使用的;
- 当然,我们也根据项目的需求自己写ORM框架。
# 三、MyBatis核心配置
在MyBatis中我们发现其实他最核心的应该是那两个配置文件,一个全局配置文件,一个映射文件。我们只要把这两个文件弄清楚,其实对于MyBatis的使用就掌握了大部分。接下来我们详细的给大家来介绍下这两个配置文件
# 1.全局配置文件
MyBatis 的配置文件包含了会深深影响 MyBatis 行为的设置和属性信息。 配置文档的顶层结构如下:
- configuration(配置)
- properties(属性)
- settings(设置)
- typeAliases(类型别名)
- typeHandlers(类型处理器)
- objectFactory(对象工厂)
- plugins(插件)
- environments(环境配置)
- environment(环境变量)
- transactionManager(事务管理器)
- dataSource(数据源)
- environment(环境变量)
- databaseIdProvider(数据库厂商标识)
- mappers(映射器)
# 1.1 configuration
configuration是整个配置文件的根标签,实际上也对应着MyBatis里面最重要的配置类Configuration。它贯穿MyBatis执行流程的每一个环节。我们打开这个类看一下,这里面有很多的属性,跟其他的子标签也能对应上。
# 1.2 properties
第一个一级标签是properties,用来配置参数信息,比如最常见的数据库连接信息。
为了避免直接把参数写死在xml配置文件中,我们可以把这些参数单独放在properties文件中,用properties标签引入进来,然后在xml配置文件中用${}引用就可以了。可以用resource引用应用里面的相对路径,也可以用url指定本地服务器或者网络的绝对路径。
<?xml version="1.0" encoding="UTF-8" ?>
<!DOCTYPE configuration PUBLIC "-//mybatis.org//DTD Config 3.0//EN" "http://mybatis.org/dtd/mybatis-3-config.dtd">
<configuration>
	<!-- 引入一个属性文件 -->
    <properties resource="db.properties"></properties>
    <environments default="development">
        <environment id="development">
            <transactionManager type="JDBC"/><!-- 单独使用时配置成MANAGED没有事务 -->
            <dataSource type="POOLED">
                <property name="driver" value="${jdbc.driver}"/>
                <property name="url" value="${jdbc.url}"/>
                <property name="username" value="${jdbc.username}"/>
                <property name="password" value="${jdbc.password}"/>
            </dataSource>
        </environment>
    </environments>

    <mappers>
        <mapper resource="mapper/UserMapper.xml"/>
    </mappers>

</configuration>
2
3
4
5
6
7
8
9
10
11
12
13
14
15
16
17
18
19
20
21
22
# 1.3 settings
这是 MyBatis 中极为重要的调整设置,它们会改变 MyBatis 的运行时行为。 下表描述了设置中各项设置的含义、默认值等。
| 设置参数 | 描述 | 有效值 | 默认值 |
|---|---|---|---|
| cacheEnabled | 全局地开启或关闭配置文件中的所有映射器已经配置的任何缓存。 | true | false |
| lazyLoadingEnabled | 延迟加载的全局开关。当开启时,所有关联对象都会延迟加载。 特定关联关系中可通过设置fetchType属性来覆盖该项的开关状态。 | true | false |
| aggressiveLazyLoading | 当开启时,任何方法的调用都会加载该对象的所有属性。否则,每个属性会按需加载(参考lazyLoadTriggerMethods). | true | false |
| multipleResultSetsEnabled | 是否允许单一语句返回多结果集(需要兼容驱动)。 | true | false |
| useColumnLabel | 使用列标签代替列名。不同的驱动在这方面会有不同的表现, 具体可参考相关驱动文档或通过测试这两种不同的模式来观察所用驱动的结果。 | true | false |
| useGeneratedKeys | 允许 JDBC 支持自动生成主键,需要驱动兼容。 如果设置为 true 则这个设置强制使用自动生成主键,尽管一些驱动不能兼容但仍可正常工作(比如 Derby)。 | true | false |
| autoMappingBehavior | 指定 MyBatis 应如何自动映射列到字段或属性。 NONE 表示取消自动映射;PARTIAL 只会自动映射没有定义嵌套结果集映射的结果集。 FULL 会自动映射任意复杂的结果集(无论是否嵌套)。 | NONE, PARTIAL, FULL | PARTIAL |
| autoMappingUnknownColumnBehavior | 指定发现自动映射目标未知列(或者未知属性类型)的行为。 NONE: 不做任何反应WARNING: 输出提醒日志('org.apache.ibatis.session.AutoMappingUnknownColumnBehavior' 的日志等级必须设置为 WARN) FAILING: 映射失败 (抛出 SqlSessionException) | NONE, WARNING, FAILING | NONE |
| defaultExecutorType | 配置默认的执行器。SIMPLE 就是普通的执行器;REUSE 执行器会重用预处理语句(prepared statements); BATCH 执行器将重用语句并执行批量更新。 | SIMPLE REUSE BATCH | SIMPLE |
| defaultStatementTimeout | 设置超时时间,它决定驱动等待数据库响应的秒数。 | 任意正整数 | Not Set (null) |
| defaultFetchSize | 为驱动的结果集获取数量(fetchSize)设置一个提示值。此参数只可以在查询设置中被覆盖。 | 任意正整数 | Not Set (null) |
| safeRowBoundsEnabled | 允许在嵌套语句中使用分页(RowBounds)。如果允许使用则设置为false。 | true | false |
| safeResultHandlerEnabled | 允许在嵌套语句中使用分页(ResultHandler)。如果允许使用则设置为false。 | true | false |
| mapUnderscoreToCamelCase | 是否开启自动驼峰命名规则(camel case)映射,即从经典数据库列名 A_COLUMN 到经典 Java 属性名 aColumn 的类似映射。 | true| false | False |
| localCacheScope | MyBatis 利用本地缓存机制(Local Cache)防止循环引用(circular references)和加速重复嵌套查询。 默认值为 SESSION,这种情况下会缓存一个会话中执行的所有查询。 若设置值为 STATEMENT,本地会话仅用在语句执行上,对相同 SqlSession 的不同调用将不会共享数据。 | SESSION| STATEMENT | SESSION |
| jdbcTypeForNull | 当没有为参数提供特定的 JDBC 类型时,为空值指定 JDBC 类型。 某些驱动需要指定列的 JDBC 类型,多数情况直接用一般类型即可,比如 NULL、VARCHAR 或 OTHER。 | JdbcType 常量. 大多都为: NULL, VARCHAR and OTHER | OTHER |
| lazyLoadTriggerMethods | 指定哪个对象的方法触发一次延迟加载。 | 用逗号分隔的方法列表。 | equals,clone,hashCode,toString |
| defaultScriptingLanguage | 指定动态 SQL 生成的默认语言。 | 一个类型别名或完全限定类名。 | org.apache.ibatis.scripting.xmltags.XMLLanguageDriver |
| defaultEnumTypeHandler | 指定 Enum 使用的默认 TypeHandler 。 (从3.4.5开始) 一个类型别名或完全限定类名。 | org.apache.ibatis.type.EnumTypeHandler | |
| callSettersOnNulls | 指定当结果集中值为 null 的时候是否调用映射对象的 setter(map 对象时为 put)方法,这对于有 Map.keySet() 依赖或 null 值初始化的时候是有用的。注意基本类型(int、boolean等)是不能设置成 null 的。 | true| false | false |
| returnInstanceForEmptyRow | 当返回行的所有列都是空时,MyBatis默认返回null。 当开启这个设置时,MyBatis会返回一个空实例。 请注意,它也适用于嵌套的结果集 (i.e. collectioin and association)。(从3.4.2开始) | true| false | false |
| logPrefix | 指定 MyBatis 增加到日志名称的前缀。 | 任何字符串 | Not set |
| logImpl | 指定 MyBatis 所用日志的具体实现,未指定时将自动查找。 | SLF4J | LOG4J| LOG4J2 | JDK_LOGGING | COMMONS_LOGGING\ |
| proxyFactory | 指定 Mybatis 创建具有延迟加载能力的对象所用到的代理工具。 | CGLIB\ | JAVASSIST |
| vfsImpl | 指定VFS的实现 | 自定义VFS的实现的类全限定名,以逗号分隔。 | Not set |
| useActualParamName | 允许使用方法签名中的名称作为语句参数名称。 为了使用该特性,你的工程必须采用Java 8编译,并且加上-parameters选项。(从3.4.1开始) | true| false | true |
| configurationFactory | 指定一个提供Configuration实例的类。 这个被返回的Configuration实例用来加载被反序列化对象的懒加载属性值。 这个类必须包含一个签名方法static Configuration getConfiguration(). (从 3.2.3 版本开始) | 类型别名或者全类名. | Not set |
设置的案例
<settings>
        <!-- 打印查询语句 -->
        <setting name="logImpl" value="STDOUT_LOGGING" />

        <!-- 控制全局缓存(二级缓存),默认 true-->
        <setting name="cacheEnabled" value="false"/>

        <!-- 延迟加载的全局开关。当开启时,所有关联对象都会延迟加载。默认 false  -->
        <setting name="lazyLoadingEnabled" value="true"/>
        <!-- 当开启时,任何方法的调用都会加载该对象的所有属性。默认 false,可通过select标签的 fetchType来覆盖-->
        <setting name="aggressiveLazyLoading" value="true"/>
        <!--  Mybatis 创建具有延迟加载能力的对象所用到的代理工具,默认JAVASSIST -->
        <!--<setting name="proxyFactory" value="CGLIB" />-->
        <!-- STATEMENT级别的缓存,使一级缓存,只针对当前执行的这一statement有效 -->
        <!--
                <setting name="localCacheScope" value="STATEMENT"/>
        -->
        <setting name="localCacheScope" value="SESSION"/>
</settings>
2
3
4
5
6
7
8
9
10
11
12
13
14
15
16
17
18
19
# 1.4 typeAliases
TypeAlias是类型的别名,跟Linux系统里面的alias一样,主要用来简化类名全路径的拼写。比如我们的参数类型和返回值类型都可能会用到我们的Bean,如果每个地方都配置全路径的话,那么内容就比较多,还可能会写错。
我们可以为自己的Bean创建别名,既可以指定单个类,也可以指定一个package,自动转换。
<typeAliases>
    <typeAlias alias="user" type="com.boge.domain.User" />
</typeAliases>
2
3
然后在使用的时候我们就可以简化了
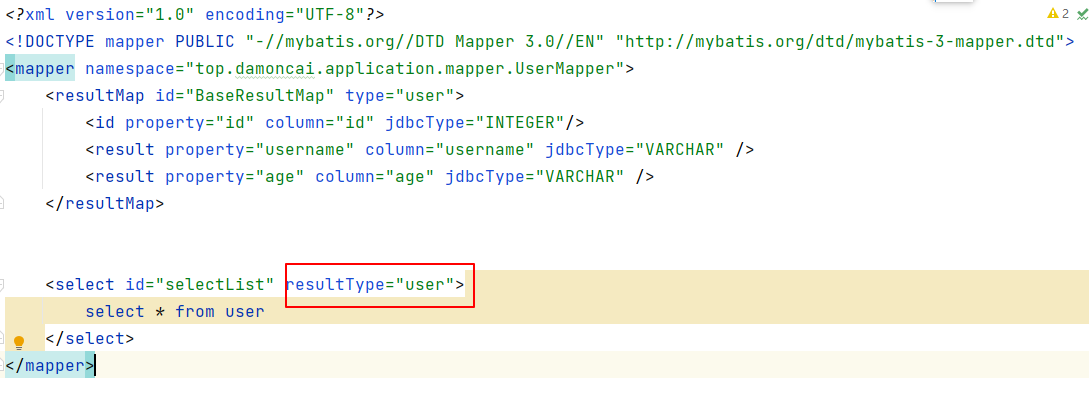
MyBatis里面有很多系统预先定义好的类型别名,在TypeAliasRegistry中。所以可以用string代替java.lang.String。
 public TypeAliasRegistry() {
    registerAlias("string", String.class);

    registerAlias("byte", Byte.class);
    registerAlias("long", Long.class);
    registerAlias("short", Short.class);
    registerAlias("int", Integer.class);
    registerAlias("integer", Integer.class);
    registerAlias("double", Double.class);
    registerAlias("float", Float.class);
    registerAlias("boolean", Boolean.class);

    registerAlias("byte[]", Byte[].class);
    registerAlias("long[]", Long[].class);
    registerAlias("short[]", Short[].class);
    registerAlias("int[]", Integer[].class);
    registerAlias("integer[]", Integer[].class);
    registerAlias("double[]", Double[].class);
    registerAlias("float[]", Float[].class);
    registerAlias("boolean[]", Boolean[].class);

    registerAlias("_byte", byte.class);
    registerAlias("_long", long.class);
    registerAlias("_short", short.class);
    registerAlias("_int", int.class);
    registerAlias("_integer", int.class);
    registerAlias("_double", double.class);
    registerAlias("_float", float.class);
    registerAlias("_boolean", boolean.class);

    registerAlias("_byte[]", byte[].class);
    registerAlias("_long[]", long[].class);
    registerAlias("_short[]", short[].class);
    registerAlias("_int[]", int[].class);
    registerAlias("_integer[]", int[].class);
    registerAlias("_double[]", double[].class);
    registerAlias("_float[]", float[].class);
    registerAlias("_boolean[]", boolean[].class);

    registerAlias("date", Date.class);
    registerAlias("decimal", BigDecimal.class);
    registerAlias("bigdecimal", BigDecimal.class);
    registerAlias("biginteger", BigInteger.class);
    registerAlias("object", Object.class);

    registerAlias("date[]", Date[].class);
    registerAlias("decimal[]", BigDecimal[].class);
    registerAlias("bigdecimal[]", BigDecimal[].class);
    registerAlias("biginteger[]", BigInteger[].class);
    registerAlias("object[]", Object[].class);

    registerAlias("map", Map.class);
    registerAlias("hashmap", HashMap.class);
    registerAlias("list", List.class);
    registerAlias("arraylist", ArrayList.class);
    registerAlias("collection", Collection.class);
    registerAlias("iterator", Iterator.class);

    registerAlias("ResultSet", ResultSet.class);
  }
2
3
4
5
6
7
8
9
10
11
12
13
14
15
16
17
18
19
20
21
22
23
24
25
26
27
28
29
30
31
32
33
34
35
36
37
38
39
40
41
42
43
44
45
46
47
48
49
50
51
52
53
54
55
56
57
58
59
60
# 1.5 TypeHandler
由于Java类型和数据库的JDBC类型不是一一对应的(比如String与varchar、char、text),所以我们把Java对象转换为数据库的值,和把数据库的值转换成Java对象,需要经过一定的转换,这两个方向的转换就要用到TypeHandler。
当参数类型和返回值是一个对象的时候,我没有做任何的配置,为什么对象里面的一个String属性,可以转换成数据库里面的varchar字段?
这是因为MyBatis已经内置了很多TypeHandler(在type包下),它们全部全部注册在TypeHandlerRegistry中,他们都继承了抽象类BaseTypeHandler,泛型就是要处理的Java数据类型。
这个也是为什么大部分类型都不需要处理。当我们查询数据和登记数据,做数据类型转换的时候,就会自动调用对应的TypeHandler的方法。
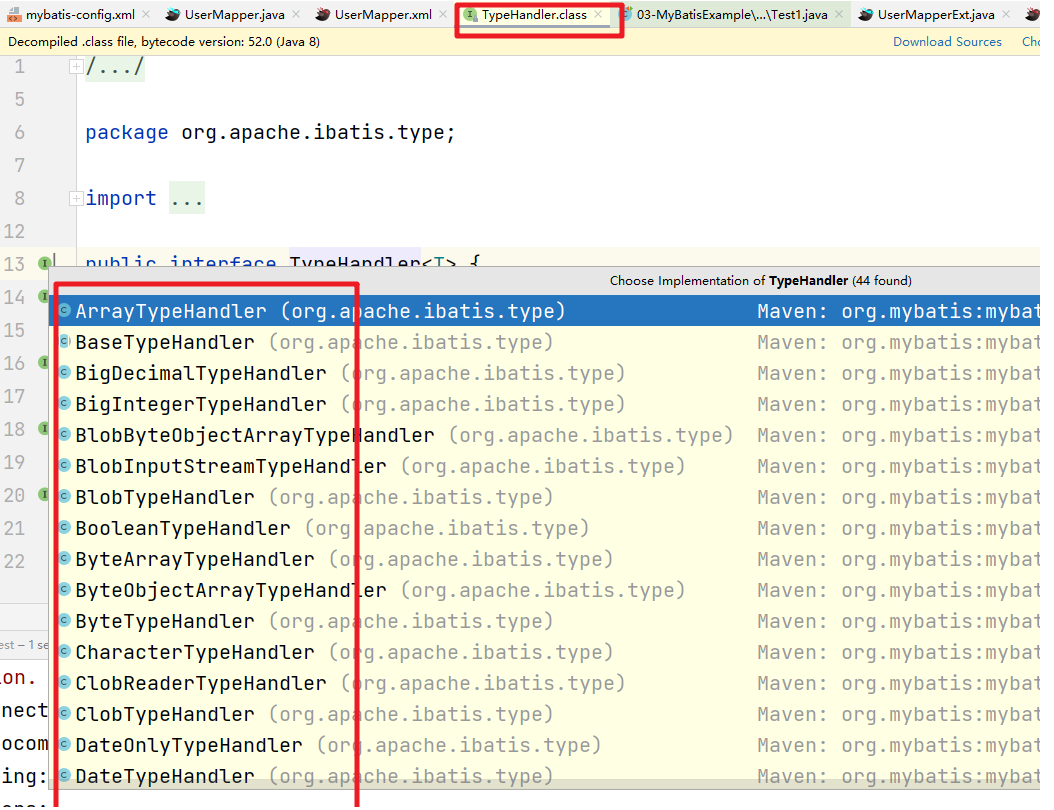
我们可以自定义一个TypeHandler来帮助我们简单的处理数据,比如查询的结果的字段如果是一个字符串,且值为"zhangsan"就修饰下这个信息
public class MyTypeHandler extends BaseTypeHandler<String> {

    /**
     * 插入数据的时候回调的方法
     * @param ps
     * @param i
     * @param parameter
     * @param jdbcType
     * @throws SQLException
     */
    @Override
    public void setNonNullParameter(PreparedStatement ps, int i, String parameter, JdbcType jdbcType) throws SQLException {
        System.out.println("---------------setNonNullParameter1:"+parameter);
        ps.setString(i, parameter);
    }

    @Override
    public String getNullableResult(ResultSet rs, String columnName) throws SQLException {
        String name = rs.getString(columnName);
        if("张三".equals(name)){
            return name+"666";
        }
        return name;
    }

    @Override
    public String getNullableResult(ResultSet rs, int columnIndex) throws SQLException {
        String name = rs.getString(columnIndex);
        if("zhangsan".equals(name)){
            return name+"666";
        }
        return name;
    }

    @Override
    public String getNullableResult(CallableStatement cs, int columnIndex) throws SQLException {
        String name = cs.getString(columnIndex);
        if("张三".equals(name)){
            return name+"666";
        }
        return name;
    }
}
2
3
4
5
6
7
8
9
10
11
12
13
14
15
16
17
18
19
20
21
22
23
24
25
26
27
28
29
30
31
32
33
34
35
36
37
38
39
40
41
42
43
同时将我们的处理器在全局配置文件中注册下
<typeHandlers>
        <typeHandler handler="top.damoncai.application.handler.MyTypeHandler"></typeHandler>
</typeHandlers>
2
3
然后我们在映射文件中配置对应的处理器

结果
==>  Preparing: select * from user
==> Parameters:
<==    Columns: id, username, age
<==        Row: 1, 张三, 12
<==        Row: 2, 李四, 16
<==      Total: 2
[User(id=1, username=张三666, age=12), User(id=2, username=李四, age=16)]
2
3
4
5
6
7
# 1.6 objectFactory
当我们把数据库返回的结果集转换为实体类的时候,需要创建对象的实例,由于我们不知道需要处理的类型是什么,有哪些属性,所以不能用new的方式去创建。只能通过反射来创建。
在MyBatis里面,它提供了一个工厂类的接口,叫做ObjectFactory,专门用来创建对象的实例(MyBatis封装之后,简化了对象的创建),里面定义了4个方法。
public interface ObjectFactory {

  default void setProperties(Properties properties) {
    // NOP
  }
  <T> T create(Class<T> type);
  <T> T create(Class<T> type, List<Class<?>> constructorArgTypes, List<Object> constructorArgs);
  <T> boolean isCollection(Class<T> type);

}
2
3
4
5
6
7
8
9
10
| 方法 | 作用 |
|---|---|
| void setProperties(Properties properties); | 设置参数时调用 |
| 创建对象(调用无参构造函数) | |
| 创建对象(调用带参数构造函数) | |
| 判断是否集合 |
ObjectFactory有一个默认的实现类DefaultObjectFactory。创建对象的方法最终都调用了instantiateClass(),这里面能看到反射的代码。
默认情况下,所有的对象都是由DefaultObjectFactory创建。
# 1.7 plugins
插件是MyBatis的一个很强大的机制。跟很多其他的框架一样,MyBatis预留了插件的接口,让MyBatis更容易扩展。
http://www.mybatis.org/mybatis-3/zh/configuration.html#plugins
# 1.8 environments
environments标签用来管理数据库的环境,比如我们可以有开发环境、测试环境、生产环境的数据库。可以在不同的环境中使用不同的数据库地址或者类型。
<environments default="development">
    <environment id="development">
        <transactionManager type="JDBC"/><!-- 单独使用时配置成MANAGED没有事务 -->
        <dataSource type="POOLED">
        <property name="driver" value="${jdbc.driver}"/>
        <property name="url" value="${jdbc.url}"/>
        <property name="username" value="${jdbc.username}"/>
        <property name="password" value="${jdbc.password}"/>
        </dataSource>
    </environment>
</environments>
2
3
4
5
6
7
8
9
10
11
environment
一个environment标签就是一个数据源,代表一个数据库。这里面有两个关键的标签,一个是事务管理器,一个是数据源。
transactionManager
如果配置的是JDBC,则会使用Connection对象的commit()、rollback()、close()管理事务。
如果配置成MANAGED,会把事务交给容器来管理,比如JBOSS,Weblogic。因为我们跑的是本地程序,如果配置成MANAGE不会有任何事务。
如果是Spring + MyBatis,则没有必要配置,因为我们会直接在applicationContext.xml里面配置数据源和事务,覆盖MyBatis的配置。
dataSource
数据源,顾名思义,就是数据的来源,一个数据源就对应一个数据库。在Java里面,它是对数据库连接的一个抽象。
一般的数据源都会包括连接池管理的功能,所以很多时候也把DataSource直接 称为连接池,准确的说法应该是:带连接池功能的数据源。
# 1.9 mappers
<mappers>标签配置的是映射器,也就是Mapper.xml的路径。这里配置的目的是让MyBatis在启动的时候去扫描这些映射器,创建映射关系。
我们有四种指定Mapper文件的方式:
http://www.mybatis.org/mybatis-3/zh/configuration.html#mappers
使用相对于类路径的资源引用(resource)
 <mappers>
     <mapper resource="UserMapper.xml"/>
 </mappers>
1
2
3使用完全限定资源定位符(绝对路径)(URL)
 <mappers>
     <mapper resource="file:///app/sale/mappers/UserMapper.xml"/>
 </mappers>
1
2
3使用映射器接口实现类的完全限定类名
<mappers>
   <mapper class="com.boge.mapper.UserMapper"/>
</mappers>
1
2
3将包内的映射器接口实现全部注册为映射器(最常用)
<mappers>
   <mapper class="com.boge.mapper"/>
</mappers>
1
2
3
# 2. 映射文件
MyBatis 的真正强大在于它的语句映射,这是它的魔力所在。由于它的异常强大,映射器的 XML 文件就显得相对简单。如果拿它跟具有相同功能的 JDBC 代码进行对比,你会立即发现省掉了将近 95% 的代码。MyBatis 致力于减少使用成本,让用户能更专注于 SQL 代码。
SQL 映射文件只有很少的几个顶级元素(按照应被定义的顺序列出):
cache– 该命名空间的缓存配置。cache-ref– 引用其它命名空间的缓存配置。resultMap– 描述如何从数据库结果集中加载对象,是最复杂也是最强大的元素。parameterMap– 老式风格的参数映射。此元素已被废弃,并可能在将来被移除!请使用行内参数映射。文档中不会介绍此元素。sql– 可被其它语句引用的可重用语句块。insert– 映射插入语句。update– 映射更新语句。delete– 映射删除语句。select– 映射查询语句。
# 2.1 cache
给定命名空间的缓存配置(是否开启二级缓存)。
# 2.2 cache-ref
其他命名空间缓存配置的引用。缓存相关两个标签我们在讲解缓存的时候会详细讲到。
# 2.3 resultMap
是最复杂也是最强大的元素,用来描述如何从数据库结果集中来加载对象。
<resultMap id="BaseResultMap" type="Employee">
   <id column="emp_id" jdbcType="INTEGER" property="empId"/>
   <result column="emp_name" jdbcType="VARCHAR" property="empName"/>
   <result column="gender" jdbcType="CHAR" property="gender"/>
   <result column="email" jdbcType="VARCHAR" property="email"/>
   <result column="d_id" jdbcType="INTEGER" property="dId"/>
</resultMap>
2
3
4
5
6
7
# 2.4 sql
可被其他语句引用的可重用语句块。
<sql id="Base_Column_List">
	emp_id, emp_name, gender, email, d_id
</sql>
2
3
# 2.5 增删改查标签
针对常用的增删改查操作提供的有对应的标签来处理
<insert> – 映射插入语句
<update> – 映射更新语句
<delete> – 映射删除语句
<select
 id="selectPerson"
 parameterType="int"
 parameterMap="deprecated"
 resultType="hashmap"
 resultMap="personResultMap"
 flushCache="false"
 useCache="true"
 timeout="10"
 fetchSize="256"
 statementType="PREPARED"
 resultSetType="FORWARD_ONLY">
2
3
4
5
6
7
8
9
10
11
12
| 属性 | 描述 |
|---|---|
id | 在命名空间中唯一的标识符,可以被用来引用这条语句。 |
parameterType | 将会传入这条语句的参数的类全限定名或别名。这个属性是可选的,因为 MyBatis 可以通过类型处理器(TypeHandler)推断出具体传入语句的参数,默认值为未设置(unset)。 |
parameterMap | 用于引用外部 parameterMap 的属性,目前已被废弃。请使用行内参数映射和 parameterType 属性。 |
resultType | 期望从这条语句中返回结果的类全限定名或别名。 注意,如果返回的是集合,那应该设置为集合包含的类型,而不是集合本身的类型。 resultType 和 resultMap 之间只能同时使用一个。 |
resultMap | 对外部 resultMap 的命名引用。结果映射是 MyBatis 最强大的特性,如果你对其理解透彻,许多复杂的映射问题都能迎刃而解。 resultType 和 resultMap 之间只能同时使用一个。 |
flushCache | 将其设置为 true 后,只要语句被调用,都会导致本地缓存和二级缓存被清空,默认值:false。 |
useCache | 将其设置为 true 后,将会导致本条语句的结果被二级缓存缓存起来,默认值:对 select 元素为 true。 |
timeout | 这个设置是在抛出异常之前,驱动程序等待数据库返回请求结果的秒数。默认值为未设置(unset)(依赖数据库驱动)。 |
fetchSize | 这是一个给驱动的建议值,尝试让驱动程序每次批量返回的结果行数等于这个设置值。 默认值为未设置(unset)(依赖驱动)。 |
statementType | 可选 STATEMENT,PREPARED 或 CALLABLE。这会让 MyBatis 分别使用 Statement,PreparedStatement 或 CallableStatement,默认值:PREPARED。 |
resultSetType | FORWARD_ONLY,SCROLL_SENSITIVE, SCROLL_INSENSITIVE 或 DEFAULT(等价于 unset) 中的一个,默认值为 unset (依赖数据库驱动)。 |
databaseId | 如果配置了数据库厂商标识(databaseIdProvider),MyBatis 会加载所有不带 databaseId 或匹配当前 databaseId 的语句;如果带和不带的语句都有,则不带的会被忽略。 |
resultOrdered | 这个设置仅针对嵌套结果 select 语句:如果为 true,将会假设包含了嵌套结果集或是分组,当返回一个主结果行时,就不会产生对前面结果集的引用。 这就使得在获取嵌套结果集的时候不至于内存不够用。默认值:false。 |
resultSets | 这个设置仅适用于多结果集的情况。它将列出语句执行后返回的结果集并赋予每个结果集一个名称,多个名称之间以逗号分隔。 |
# 四、MyBatis最佳实践
# 1.动态SQL语句
动态 SQL 是 MyBatis 的强大特性之一。如果你使用过 JDBC 或其它类似的框架,你应该能理解根据不同条件拼接 SQL 语句有多痛苦,例如拼接时要确保不能忘记添加必要的空格,还要注意去掉列表最后一个列名的逗号。利用动态 SQL,可以彻底摆脱这种痛苦。
使用动态 SQL 并非一件易事,但借助可用于任何 SQL 映射语句中的强大的动态 SQL 语言,MyBatis 显著地提升了这一特性的易用性。
如果你之前用过 JSTL 或任何基于类 XML 语言的文本处理器,你对动态 SQL 元素可能会感觉似曾相识。在 MyBatis 之前的版本中,需要花时间了解大量的元素。借助功能强大的基于 OGNL 的表达式,MyBatis 3 替换了之前的大部分元素,大大精简了元素种类,现在要学习的元素种类比原来的一半还要少。
- if
- choose (when, otherwise)
- trim (where, set)
- foreach
# 1.1 if
需要判断的时候,条件写在test中
<select id="selectListIf" parameterType="user" resultMap="BaseResultMap" >
    select
    <include refid="baseSQL"></include>
    from t_user
    <where>
        <if test="id != null">
            and id = #{id}
        </if>
        <if test="userName != null">
            and user_name = #{userName}
        </if>
    </where>
</select>
2
3
4
5
6
7
8
9
10
11
12
13
# 1.2 choose
需要选择一个条件的时候
<!-- choose 的使用 -->
<select id="selectListChoose" parameterType="user" resultMap="BaseResultMap" >
    select
    <include refid="baseSQL"></include>
    from t_user
    <where>
        <choose>
            <when test="id != null">
                id = #{id}
            </when>
            <when test="userName != null and userName != ''">
                and user_name like CONCAT(CONCAT('%',#{userName,jdbcType=VARCHAR}),'%')
            </when>
            <otherwise>

            </otherwise>
        </choose>
    </where>
</select>
2
3
4
5
6
7
8
9
10
11
12
13
14
15
16
17
18
19
# 1.3 trim
需要去掉where、and、逗号之类的符号的时候
<!--
    trim 的使用
    替代where标签的使用
    -->
    <select id="selectListTrim" resultMap="BaseResultMap"
    parameterType="user">
    select <include refid="baseSQL"></include>
    <!-- <where>
    <if test="username!=null">
        and name = #{username}
</if>
    </where> -->
    <trim prefix="where" prefixOverrides="AND |OR ">
    <if test="userName!=null">
        and user_name = #{userName}
</if>
    <if test="age != 0">
        and age = #{age}
</if>
    </trim>
    </select>

    <!-- 替代set标签的使用 -->
    <update id="updateUser" parameterType="User">
    update t_user
    <trim prefix="set" suffixOverrides=",">
    <if test="userName!=null">
        user_name = #{userName},
</if>
    <if test="age != 0">
        age = #{age}
</if>
    </trim>
    where id=#{id}
</update>
2
3
4
5
6
7
8
9
10
11
12
13
14
15
16
17
18
19
20
21
22
23
24
25
26
27
28
29
30
31
32
33
34
35
# 1.4 foreach
需要遍历集合的时候
<delete id="deleteByList" parameterType="java.util.List">
    delete from t_user
    where id in
    <foreach collection="list" item="item" open="(" separator="," close=")">
        #{item.id,jdbcType=INTEGER}
    </foreach>
</delete>
2
3
4
5
6
7
# 2.批量操作
我们在项目中会有一些批量操作的场景,比如导入文件批量处理数据的情况(批量新增商户、批量修改商户信息),当数据量非常大,比如超过几万条的时候,在Java代码中循环发送SQL到数据库执行肯定是不现实的,因为这个意味着要跟数据库创建几万次会话。即使在同一个连接中,也有重复编译和执行SQL的开销。
# 2.1 BatchExecutor
当然MyBatis的动态标签的批量操作也是存在一定的缺点的,比如数据量特别大的时候,拼接出来的SQL语句过大。
MySQL的服务端对于接收的数据包有大小限制,max_allowed_packet 默认是 4M,需要修改默认配置或者手动地控制条数,才可以解决这个问题。
Caused by: com.mysql.jdbc.PacketTooBigException: Packet for query is too large (7188967 > 4194304). You can change this value on the server by setting the max_allowed_packet' variable.
在我们的全局配置文件中,可以配置默认的Executor的类型(默认是SIMPLE)。其中有一种BatchExecutor。
<setting name="defaultExecutorType" value="BATCH" />
也可以在创建会话的时候指定执行器类型
SqlSession session = sqlSessionFactory.openSession(ExecutorType.BATCH);
Executor

- SimpleExecutor:每执行一次update或select,就开启一个Statement对象,用完立刻关闭Statement对象。
- ReuseExecutor:执行update或select,以sql作为key查找Statement对象,存在就使用,不存在就创建,用完后,不关闭Statement对象,而是放置于Map内,供下一次使用。简言之,就是重复使用Statement对象。
- BatchExecutor:执行update(没有select,JDBC批处理不支持select),将所有sql都添加到批处理中(addBatch()),等待统一执行(executeBatch()),它缓存了多个Statement对象,每个Statement对象都是addBatch()完毕后,等待逐一执行executeBatch()批处理。与JDBC批处理相同。executeUpdate()是一个语句访问一次数据库,executeBatch()是一批语句访问一次数据库(具体一批发送多少条SQL跟服务端的max_allowed_packet有关)。BatchExecutor底层是对JDBC ps.addBatch()和ps. executeBatch()的封装。
@Test
public void testJdbcBatch() throws IOException {
   Connection conn = null;
   PreparedStatement ps = null;

   try {
       conn = DriverManager.getConnection("jdbc:mysql://localhost:3306/mybatisdb?rewriteBatchedStatements=true", "root", "123456");
       ps = conn.prepareStatement(
               "INSERT into blog values (?, ?, ?)");

       for (int i = 1000; i < 101000; i++) {
           Blog blog = new Blog();
           ps.setInt(1, i);
           ps.setString(2, String.valueOf(i)+"");
           ps.setInt(3, 1001);
           ps.addBatch();
      }

       ps.executeBatch();
       ps.close();
       conn.close();
  } catch (SQLException se) {
       se.printStackTrace();
  } catch (Exception e) {
       e.printStackTrace();
  } finally {
       try {
           if (ps != null) ps.close();
      } catch (SQLException se2) {
      }
       try {
           if (conn != null) conn.close();
      } catch (SQLException se) {
           se.printStackTrace();
      }
  }
}
2
3
4
5
6
7
8
9
10
11
12
13
14
15
16
17
18
19
20
21
22
23
24
25
26
27
28
29
30
31
32
33
34
35
36
37
# 3.关联查询
# 3.1 嵌套查询
用户和部门的对应关系是1对1的关系
<!-- 嵌套查询 1对1 1个用户对应一个部门-->
    <resultMap id="nestedMap1" type="user">
        <id property="id" column="id" jdbcType="INTEGER"/>
        <result property="userName" column="user_name" jdbcType="VARCHAR" />
        <result property="realName" column="real_name" jdbcType="VARCHAR" />
        <result property="password" column="password" jdbcType="VARCHAR"/>
        <result property="age" column="age" jdbcType="INTEGER"/>
        <result property="dId" column="d_id" jdbcType="INTEGER"/>
        <association property="dept" javaType="dept">
            <id column="did" property="dId"/>
            <result column="d_name" property="dName"/>
            <result column="d_desc" property="dDesc"/>
        </association>
    </resultMap>

    <select id="queryUserNested" resultMap="nestedMap1">
        SELECT
            t1.`id`
            ,t1.`user_name`
            ,t1.`real_name`
            ,t1.`password`
            ,t1.`age`
            ,t2.`did`
            ,t2.`d_name`
            ,t2.`d_desc`
        FROM t_user t1
        LEFT JOIN
            t_department t2
            ON t1.`d_id` = t2.`did`
    </select>
2
3
4
5
6
7
8
9
10
11
12
13
14
15
16
17
18
19
20
21
22
23
24
25
26
27
28
29
30
还有就是1对多的关联关系,嵌套查询
<!-- 嵌套查询 1对多 1个部门有多个用户-->
    <resultMap id="nestedMap2" type="dept">
        <id column="did" property="dId"/>
        <result column="d_name" property="dName"/>
        <result column="d_desc" property="dDesc"/>
        <collection property="users" ofType="user">
            <id property="id" column="id" jdbcType="INTEGER"/>
            <result property="userName" column="user_name" jdbcType="VARCHAR" />
            <result property="realName" column="real_name" jdbcType="VARCHAR" />
            <result property="password" column="password" jdbcType="VARCHAR"/>
            <result property="age" column="age" jdbcType="INTEGER"/>
            <result property="dId" column="d_id" jdbcType="INTEGER"/>
        </collection>
    </resultMap>
    <select id="queryDeptNested" resultMap="nestedMap2">
        SELECT
            t1.`id`
            ,t1.`user_name`
            ,t1.`real_name`
            ,t1.`password`
            ,t1.`age`
            ,t2.`did`
            ,t2.`d_name`
            ,t2.`d_desc`
        FROM t_user t1
        RIGHT JOIN
            t_department t2
            ON t1.`d_id` = t2.`did`
    </select>
2
3
4
5
6
7
8
9
10
11
12
13
14
15
16
17
18
19
20
21
22
23
24
25
26
27
28
29
# 3.2 延迟加载
在MyBatis里面可以通过开启延迟加载的开关来解决这个问题。
在settings标签里面可以配置:
<!--延迟加载的全局开关。当开启时,所有关联对象都会延迟加载。默认false -->
<setting name="lazyLoadingEnabled" value="true"/>
<!--当开启时,任何方法的调用都会加载该对象的所有属性。默认false,可通过select标签的 fetchType来覆盖-->
<setting name="aggressiveLazyLoading" value="false"/>
<!-- MyBatis 创建具有延迟加载能力的对象所用到的代理工具,默认JAVASSIST -->
<setting name="proxyFactory" value="CGLIB" />
2
3
4
5
6
lazyLoadingEnabled决定了是否延迟加载(默认false)。
aggressiveLazyLoading决定了是不是对象的所有方法都会触发查询。
1对1的延迟加载配置
    <!-- 延迟加载 1对1 -->
    <resultMap id="nestedMap1Lazy" type="user">
        <id property="id" column="id" jdbcType="INTEGER"/>
        <result property="userName" column="user_name" jdbcType="VARCHAR" />
        <result property="realName" column="real_name" jdbcType="VARCHAR" />
        <result property="password" column="password" jdbcType="VARCHAR"/>
        <result property="age" column="age" jdbcType="INTEGER"/>
        <result property="dId" column="d_id" jdbcType="INTEGER"/>
        <association property="dept" javaType="dept" column="d_id" select="queryDeptByUserIdLazy">

        </association>
    </resultMap>
    <resultMap id="baseDept" type="dept">
        <id column="did" property="dId"/>
        <result column="d_name" property="dName"/>
        <result column="d_desc" property="dDesc"/>
    </resultMap>
    <select id="queryUserNestedLazy" resultMap="nestedMap1Lazy">
        SELECT
            t1.`id`
            ,t1.`user_name`
            ,t1.`real_name`
            ,t1.`password`
            ,t1.`age`
            ,t1.d_id
        FROM t_user t1
    </select>
    <select id="queryDeptByUserIdLazy" parameterType="int" resultMap="baseDept">
        select * from t_department where did = #{did}
    </select>
2
3
4
5
6
7
8
9
10
11
12
13
14
15
16
17
18
19
20
21
22
23
24
25
26
27
28
29
30
注意:开启了延迟加载的开关,调用user.getDept()以及默认的(equals,clone,hashCode,toString)时才会发起第二次查询,其他方法并不会触发查询,比如blog.getName();
 /**
     * 1对1  关联查询 延迟加载
     * @throws Exception
     */
    @Test
    public void test03() throws Exception{
        init();
        UserMapper mapper = session.getMapper(UserMapper.class);
        List<User> users = mapper.queryUserNestedLazy();
        for (User user : users) {
            System.out.println(user.getUserName() );
            //System.out.println(user.getUserName() + "---->"+user.getDept());
        }
    }
2
3
4
5
6
7
8
9
10
11
12
13
14
触发延迟加载的方法可以通过<lazyLoadTriggerMethods>配置,默认 equals(),clone(),hashCode(),toString()。
1对多的延迟加载的配置
<!-- 1对多 延迟加载 -->
<resultMap id="nestedMap2Lazy" type="dept">
    <id column="did" property="dId"/>
    <result column="d_name" property="dName"/>
    <result column="d_desc" property="dDesc"/>
    <collection property="users" ofType="user" column="did" select="queryUserByDeptLazy">
    </collection>
</resultMap>

<select id="queryDeptNestedLazy" resultMap="nestedMap2">
    SELECT
    ,t2.`did`
    ,t2.`d_name`
    ,t2.`d_desc`
    FROM
    t_department t2

</select>

<select id="queryUserByDeptLazy"  resultMap="BaseResultMap" >
    select * from t_user where d_id = #{did}
</select>
2
3
4
5
6
7
8
9
10
11
12
13
14
15
16
17
18
19
20
21
22
# 4.分页操作
# 4.1 逻辑分页
MyBatis里面有一个逻辑分页对象RowBounds,里面主要有两个属性,offset和limit(从第几条开始,查询多少条)。我们可以在Mapper接口的方法上加上这个参数,不需要修改xml里面的SQL语句。
接口中定义
public List<User> queryUserList(RowBounds rowBounds);
测试类
@Test
public void test01() throws Exception{
    init();
    UserMapper mapper = session.getMapper(UserMapper.class);
    // 设置分页的数据
    RowBounds rowBounds = new RowBounds(1,3);
    List<User> users = mapper.queryUserList(rowBounds);
    for (User user : users) {
        System.out.println(user);
    }
}
2
3
4
5
6
7
8
9
10
11
RowBounds的工作原理其实是对ResultSet的处理。它会舍弃掉前面offset条数据,然后再取剩下的数据的limit条。
// DefaultResultSetHandler.java
private void handleRowValuesForSimpleResultMap(ResultSetWrapper rsw, ResultMap resultMap, ResultHandler<?> resultHandler, RowBounds rowBounds, ResultMapping parentMapping) throws SQLException {
   DefaultResultContext<Object> resultContext = new DefaultResultContext();
   ResultSet resultSet = rsw.getResultSet();
   this.skipRows(resultSet, rowBounds);
   while(this.shouldProcessMoreRows(resultContext, rowBounds) && !resultSet.isClosed() && resultSet.next()) {
       ResultMap discriminatedResultMap = this.resolveDiscriminatedResultMap(resultSet, resultMap, (String)null);
       Object rowValue = this.getRowValue(rsw, discriminatedResultMap, (String)null);
       this.storeObject(resultHandler, resultContext, rowValue, parentMapping, resultSet);
  }
}
2
3
4
5
6
7
8
9
10
11
很明显,如果数据量大的话,这种翻页方式效率会很低(跟查询到内存中再使用subList(start,end)没什么区别)。所以我们要用到物理翻页。
# 4.2 物理分页
物理翻页是真正的翻页,它是通过数据库支持的语句来翻页。
第一种简单的办法就是传入参数(或者包装一个page对象),在SQL语句中翻页。
<select id="selectUserPage" parameterType="map" resultMap="BaseResultMap">
  select * from t_user limit #{curIndex} , #{pageSize}
</select>
2
3
那我们就需要一种通用的方式,不需要去修改配置的任何一条SQL语句,我们只要传入当前是第几页,每页多少条就可以了,自动计算出来起止序号。
我们最常用的做法就是使用翻页的插件,比如PageHelper。
// pageSize每一页几条
PageHelper.startPage(pn, 10);
List<Employee> emps = employeeService.getAll();
// navigatePages 导航页码数
PageInfo page = new PageInfo(emps, 10);
return Msg.success().add("pageInfo", page);
2
3
4
5
6
PageHelper是通过MyBatis的拦截器实现的,插件的具体原理我们后面的课再分析。简单地来说,它会根据PageHelper的参数,改写我们的SQL语句。比如MySQL会生成limit语句,Oracle会生成rownum语句,SQL Server会生成top语句。
# 5.MBG与Example
https://github.com/mybatis/generator
我们在项目中使用MyBaits的时候,针对需要操作的一张表,需要创建实体类、Mapper映射器、Mapper接口,里面又有很多的字段和方法的配置,这部分的工作是非常繁琐的。而大部分时候我们对于表的基本操作是相同的,比如根据主键查询、根据Map查询、单条插入、批量插入、根据主键删除等等等等。当我们的表很多的时候,意味着有大量的重复工作。
所以有没有一种办法,可以根据我们的表,自动生成实体类、Mapper映射器、Mapper接口,里面包含了我们需要用到的这些基本方法和SQL呢?
MyBatis也提供了一个代码生成器,叫做MyBatis Generator,简称MBG(它是MyBatis的一个插件)。我们只需要修改一个配置文件,使用相关的jar包命令或者Java代码就可以帮助我们生成实体类、映射器和接口文件。
MBG的配置文件里面有一个Example的开关,这个东西用来构造复杂的筛选条件的,换句话说就是根据我们的代码去生成where条件。
原理:在实体类中包含了两个有继承关系的Criteria,用其中自动生成的方法来构建查询条件。把这个包含了Criteria的实体类作为参数传到查询参数中,在解析Mapper映射器的时候会转换成SQL条件。
# 5.1 添加配置文件
我们添加如下的配置文件generatorConfiguration.xml
<?xml version="1.0" encoding="UTF-8"?>
<!DOCTYPE generatorConfiguration
        PUBLIC "-//mybatis.org//DTD MyBatis Generator Configuration 1.0//EN"
        "http://mybatis.org/dtd/mybatis-generator-config_1_0.dtd">

<generatorConfiguration>
    <!-- 数据库的驱动包路径 -->
    <classPathEntry location="C:\Users\dpb\.m2\repository\mysql\mysql-connector-java\8.0.11\mysql-connector-java-8.0.11.jar" />

    <context id="DB2Tables" targetRuntime="MyBatis3">
        <!-- 去掉生成文件中的注释 -->
        <commentGenerator>
            <property name="suppressAllComments" value="true" />
        </commentGenerator>
        <!-- 数据库链接URL、用户名、密码 -->
        <jdbcConnection driverClass="com.mysql.cj.jdbc.Driver"
                        connectionURL="jdbc:mysql://localhost:3306/mybatisdb?characterEncoding=utf-8&serverTimezone=UTC"
                        userId="root"
                        password="123456">
            <property name="nullCatalogMeansCurrent" value="true" />
        </jdbcConnection>
        <!-- <jdbcConnection driverClass="oracle.jdbc.driver.OracleDriver"
              connectionURL="jdbc:oracle:thin:@localhost:1521:XE"
              userId="car"
              password="car">
      </jdbcConnection>  -->

        <javaTypeResolver >
            <property name="forceBigDecimals" value="false" />
        </javaTypeResolver>
        <!-- 生成模型的包名和位置 -->
        <javaModelGenerator targetPackage="com.boge.vip.domain" targetProject="./src/main/java">
            <!-- 是否在当前路径下新加一层schema,eg:fase路径com.oop.eksp.user.model, true:com.oop.eksp.user.model.[schemaName] -->
            <property name="enableSubPackages" value="false" />
            <property name="trimStrings" value="true" />
        </javaModelGenerator>
        <!-- 生成的映射文件包名和位置 -->
        <sqlMapGenerator targetPackage="com.boge.vip.mapper"  targetProject="./src/main/java">
            <property name="enableSubPackages" value="false" />
        </sqlMapGenerator>
        <!-- 生成DAO的包名和位置 -->
        <javaClientGenerator type="XMLMAPPER" targetPackage="com.boge.vip.mapper"  targetProject="./src/main/java">
            <property name="enableSubPackages" value="false" />
        </javaClientGenerator>

        <table  tableName="t_user" domainObjectName="User"   />


    </context>
</generatorConfiguration>
2
3
4
5
6
7
8
9
10
11
12
13
14
15
16
17
18
19
20
21
22
23
24
25
26
27
28
29
30
31
32
33
34
35
36
37
38
39
40
41
42
43
44
45
46
47
48
49
50
# 5.2 添加插件
<build>
    <plugins>
        <plugin>
            <groupId>org.mybatis.generator</groupId>
            <artifactId>mybatis-generator-maven-plugin</artifactId>
            <version>1.3.2</version>
            <configuration>
                <!-- 指定配置文件的位置 -->
                <configurationFile>src/main/resources/generatorConfig.xml</configurationFile>
            </configuration>
        </plugin>
    </plugins>
</build>
2
3
4
5
6
7
8
9
10
11
12
13
# 5.3 生成
然后我们就可以利用插件帮助我们快速生成我们需要的表结构对应的相关文件
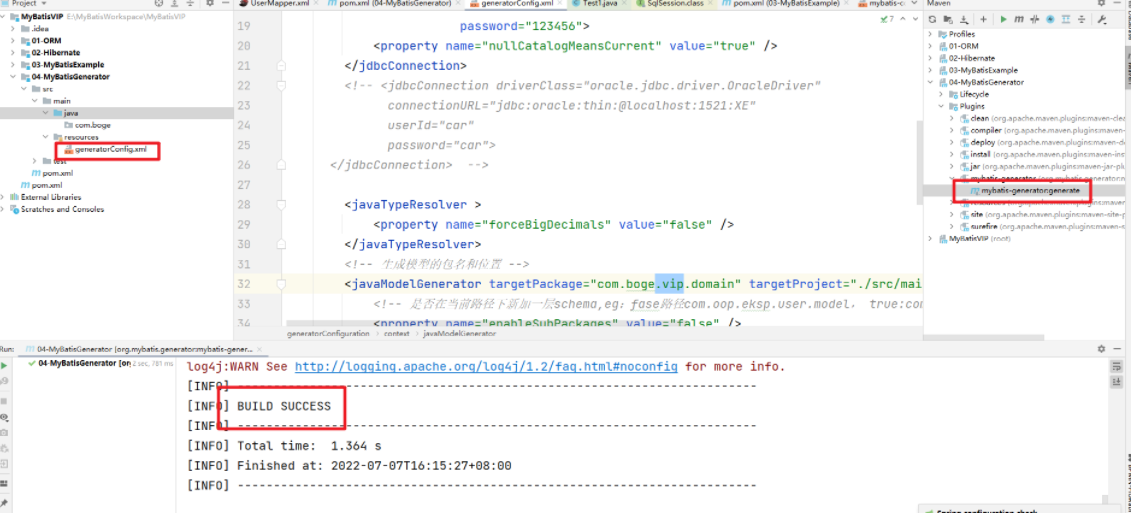
# 6. 通用Mapper
https://github.com/abel533/Mapper/wiki
# 7.MyBatis-Plus
https://mybatis.plus/guide
