并发编程
# 一、线程基础概念
# 一、基础概念
# 1.1 进程与线程
什么是进程?
进程是指运行中的程序。 比如我们使用钉钉,浏览器,需要启动这个程序,操作系统会给这个程序分配一定的资源(占用内存资源)。
什么线程?
线程是CPU调度的基本单位,每个线程执行的都是某一个进程的代码的某个片段。
所谓进程就是线程的容器,需要线程利用进程中的一些资源,处理一个代码、指令。最终实现进程锁预期的结果。
进程和线程的区别:
- 根本不同:进程是操作系统分配的资源,而线程是CPU调度的基本单位。
- 资源方面:同一个进程下的线程共享进程中的一些资源。线程同时拥有自身的独立存储空间。进程之间的资源通常是独立的。
- 数量不同:进程一般指的就是一个进程。而线程是依附于某个进程的,而且一个进程中至少会有一个或多个线程。
- 开销不同:毕竟进程和线程不是一个级别的内容,线程的创建和终止的时间是比较短的。而且线程之间的切换比进程之间的切换速度要快很多。而且进程之间的通讯很麻烦,一般要借助内核才可以实现,而线程之间通讯,相当方面。
- ..............
# 1.2 多线程
多线程是指:单个进程中同时运行多个线程。
多线程的目的是为了提高CPU的利用率。
可以通过避免一些网络IO或者磁盘IO等需要等待的操作,让CPU去调度其他线程。
这样可以大幅度的提升程序的效率,提高用户的体验。
比如Tomcat可以做并行处理,提升处理的效率,而不是一个一个排队。
不如要处理一个网络等待的操作,开启一个线程去处理需要网络等待的任务,让当前业务线程可以继续往下执行逻辑,效率是可以得到大幅度提升的。
多线程的局限
- 如果线程数量特别多,CPU在切换线程上下文时,会额外造成很大的消耗。
- 任务的拆分需要依赖业务场景,有一些异构化的任务,很难对任务拆分,还有很多业务并不是多线程处理更好。
- 线程安全问题:虽然多线程带来了一定的性能提升,但是再做一些操作时,多线程如果操作临界资源,可能会发生一些数据不一致的安全问题,甚至涉及到锁操作时,会造成死锁问题。
# 1.3 串行、并行、并发
什么是串行:
串行就是一个一个排队,第一个做完,第二个才能上。
什么是并行:
并行就是同时处理。
什么是并发:
CPU在极短的时间内,反复切换执行不同的线程,看似好像是并行,但是知识CPU高速的切换。
并行囊括并发。
并行就是多核CPU同时调度多个线程,是真正的多个线程同时执行。
单核CPU无法实现并行效果,单核CPU是并发。
# 1.4 同步异步、阻塞非阻塞
同步与异步:执行某个功能后,被调用者是否会主动反馈信息
阻塞和非阻塞:执行某个功能后,调用者是否需要一直等待结果的反馈。
同步阻塞:比如用锅烧水,水开后,不会主动通知你。烧水开始执行后,需要一直等待水烧开。
同步非阻塞:比如用锅烧水,水开后,不会主动通知你。烧水开始执行后,不需要一直等待水烧开,可以去执行其他功能,但是需要时不时的查看水开了没。
异步阻塞:比如用水壶烧水,水开后,会主动通知你水烧开了。烧水开始执行后,需要一直等待水烧开。
异步非阻塞:比如用水壶烧水,水开后,会主动通知你水烧开了。烧水开始执行后,不需要一直等待水烧开,可以去执行其他功能。
异步非阻塞这个效果是最好的,平时开发时,提升效率最好的方式就是采用异步非阻塞的方式处理一些多线程的任务。
# 二、线程的创建
线程的创建分为三种方式:
# 2.1 继承Thread类 重写run方法
启动线程是调用start方法,这样会创建一个新的线程,并执行线程的任务。
如果直接调用run方法,这样会让当前线程执行run方法中的业务逻辑。
public class MiTest {

    public static void main(String[] args) {
        MyJob t1 = new MyJob();
        t1.start();
        for (int i = 0; i < 100; i++) {
            System.out.println("main:" + i);
        }
    }

}
class MyJob extends Thread{
    @Override
    public void run() {
        for (int i = 0; i < 100; i++) {
            System.out.println("MyJob:" + i);
        }
    }
}
2
3
4
5
6
7
8
9
10
11
12
13
14
15
16
17
18
19
# 2.2 实现Runnable接口 重写run方法
public class MiTest {

    public static void main(String[] args) {
        MyRunnable myRunnable = new MyRunnable();
        Thread t1 = new Thread(myRunnable);
        t1.start();
        for (int i = 0; i < 1000; i++) {
            System.out.println("main:" + i);
        }
    }

}

class MyRunnable implements Runnable{

    @Override
    public void run() {
        for (int i = 0; i < 1000; i++) {
            System.out.println("MyRunnable:" + i);
        }

    }
}
2
3
4
5
6
7
8
9
10
11
12
13
14
15
16
17
18
19
20
21
22
23
最常用的方式:
匿名内部类方式:
Thread t1 = new Thread(new Runnable() {
    @Override
    public void run() {
        for (int i = 0; i < 1000; i++) {
            System.out.println("匿名内部类:" + i);
        }
    }
});
1
2
3
4
5
6
7
8lambda方式:
Thread t2 = new Thread(() -> {
    for (int i = 0; i < 100; i++) {
        System.out.println("lambda:" + i);
    }
});
1
2
3
4
5
# 2.3 实现Callable 重写call方法,配合FutureTask
Callable一般用于有返回结果的非阻塞的执行方法
同步非阻塞。
public class MiTest {

    public static void main(String[] args) throws ExecutionException, InterruptedException {
        //1. 创建MyCallable
        MyCallable myCallable = new MyCallable();
        //2. 创建FutureTask,传入Callable
        FutureTask futureTask = new FutureTask(myCallable);
        //3. 创建Thread线程
        Thread t1 = new Thread(futureTask);
        //4. 启动线程
        t1.start();
        //5. 做一些操作
        //6. 要结果
        Object count = futureTask.get();
        System.out.println("总和为:" + count);
    }
}

class MyCallable implements Callable{

    @Override
    public Object call() throws Exception {
        int count = 0;
        for (int i = 0; i < 100; i++) {
            count += i;
        }
        return count;
    }
}
2
3
4
5
6
7
8
9
10
11
12
13
14
15
16
17
18
19
20
21
22
23
24
25
26
27
28
29
# 三、线程的使用
# 3.1 线程的状态
网上对线程状态的描述很多,有5种,6种,7种,都可以接受
5中状态一般是针对传统的线程状态来说

Java中给线程准备的6种状态 Thread类中枚举定义
public enum State {
        /**
         * Thread state for a thread which has not yet started.
         */
        NEW,

        /**
         * Thread state for a runnable thread.  A thread in the runnable
         * state is executing in the Java virtual machine but it may
         * be waiting for other resources from the operating system
         * such as processor.
         */
        RUNNABLE,

        /**
         * Thread state for a thread blocked waiting for a monitor lock.
         * A thread in the blocked state is waiting for a monitor lock
         * to enter a synchronized block/method or
         * reenter a synchronized block/method after calling
         * {@link Object#wait() Object.wait}.
         */
        BLOCKED,

        /**
         * Thread state for a waiting thread.
         * A thread is in the waiting state due to calling one of the
         * following methods:
         * <ul>
         *   <li>{@link Object#wait() Object.wait} with no timeout</li>
         *   <li>{@link #join() Thread.join} with no timeout</li>
         *   <li>{@link LockSupport#park() LockSupport.park}</li>
         * </ul>
         *
         * <p>A thread in the waiting state is waiting for another thread to
         * perform a particular action.
         *
         * For example, a thread that has called <tt>Object.wait()</tt>
         * on an object is waiting for another thread to call
         * <tt>Object.notify()</tt> or <tt>Object.notifyAll()</tt> on
         * that object. A thread that has called <tt>Thread.join()</tt>
         * is waiting for a specified thread to terminate.
         */
        WAITING,

        /**
         * Thread state for a waiting thread with a specified waiting time.
         * A thread is in the timed waiting state due to calling one of
         * the following methods with a specified positive waiting time:
         * <ul>
         *   <li>{@link #sleep Thread.sleep}</li>
         *   <li>{@link Object#wait(long) Object.wait} with timeout</li>
         *   <li>{@link #join(long) Thread.join} with timeout</li>
         *   <li>{@link LockSupport#parkNanos LockSupport.parkNanos}</li>
         *   <li>{@link LockSupport#parkUntil LockSupport.parkUntil}</li>
         * </ul>
         */
        TIMED_WAITING,

        /**
         * Thread state for a terminated thread.
         * The thread has completed execution.
         */
        TERMINATED;
    }
2
3
4
5
6
7
8
9
10
11
12
13
14
15
16
17
18
19
20
21
22
23
24
25
26
27
28
29
30
31
32
33
34
35
36
37
38
39
40
41
42
43
44
45
46
47
48
49
50
51
52
53
54
55
56
57
58
59
60
61
62
63
64
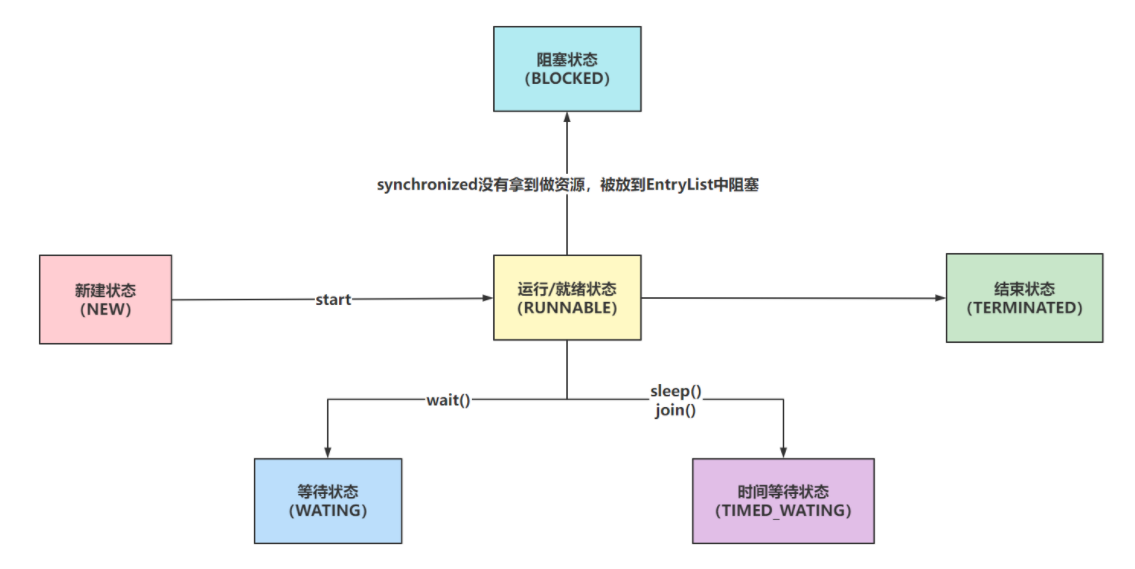
NEW:Thread对象被创建出来了,但是还没有执行start方法。
RUNNABLE:Thread对象调用了start方法,就为RUNNABLE状态(CPU调度/没有调度)
BLOCKED、WAITING、TIME_WAITING:都可以理解为是阻塞、等待状态,因为处在这三种状态下,CPU不会调度当前线程
BLOCKED:synchronized没有拿到同步锁,被阻塞的情况
WAITING:调用wait方法就会处于WAITING状态,需要被手动唤醒
TIME_WAITING:调用sleep方法或者join方法,会被自动唤醒,无需手动唤醒
TERMINATED:run方法执行完毕,线程生命周期到头了
在Java代码中验证一下效果
NEW:
public static void main(String[] args) throws InterruptedException {
    Thread t1 = new Thread(() -> {

    });
    System.out.println(t1.getState());
}
2
3
4
5
6
RUNNABLE:
public static void main(String[] args) throws InterruptedException {
    Thread t1 = new Thread(() -> {
        while(true){

        }
    });
    t1.start();
    Thread.sleep(500);
    System.out.println(t1.getState());
}
2
3
4
5
6
7
8
9
10
BLOCKED:
public static void main(String[] args) throws InterruptedException {
    Object obj = new Object();
    Thread t1 = new Thread(() -> {
        // t1线程拿不到锁资源,导致变为BLOCKED状态
        synchronized (obj){

        }
    });
    // main线程拿到obj的锁资源
    synchronized (obj) {
        t1.start();
        Thread.sleep(500);
        System.out.println(t1.getState());
    }
}
2
3
4
5
6
7
8
9
10
11
12
13
14
15
WAITING:
public static void main(String[] args) throws InterruptedException {
    Object obj = new Object();
    Thread t1 = new Thread(() -> {
        synchronized (obj){
            try {
                obj.wait();
            } catch (InterruptedException e) {
                e.printStackTrace();
            }
        }
    });
    t1.start();
    Thread.sleep(500);
    System.out.println(t1.getState());
}
2
3
4
5
6
7
8
9
10
11
12
13
14
15
TIMED_WAITING:
public static void main(String[] args) throws InterruptedException {
    Thread t1 = new Thread(() -> {
        try {
            Thread.sleep(1000);
        } catch (InterruptedException e) {
            e.printStackTrace();
        }
    });
    t1.start();
    Thread.sleep(500);
    System.out.println(t1.getState());
}
2
3
4
5
6
7
8
9
10
11
12
TERMINATED:
public static void main(String[] args) throws InterruptedException {
    Thread t1 = new Thread(() -> {
        try {
            Thread.sleep(500);
        } catch (InterruptedException e) {
            e.printStackTrace();
        }
    });
    t1.start();
    Thread.sleep(1000);
    System.out.println(t1.getState());
}
2
3
4
5
6
7
8
9
10
11
12
# 3.2 线程的常用方法
# 3.2.1 获取当前线程
Thread的静态方法获取当前线程对象
public static void main(String[] args) throws ExecutionException, InterruptedException {
	// 获取当前线程的方法
    Thread main = Thread.currentThread();
    System.out.println(main);
    // "Thread[" + getName() + "," + getPriority() + "," +  group.getName() + "]";
    // Thread[main,5,main]
}
2
3
4
5
6
7
# 3.2.2 线程的名字
在构建Thread对象完毕后,一定要设置一个有意义的名称,方面后期排查错误
public static void main(String[] args) throws ExecutionException, InterruptedException {
    Thread t1 = new Thread(() -> {
        System.out.println(Thread.currentThread().getName());
    });
    t1.setName("模块-功能-计数器");
    t1.start();
}
2
3
4
5
6
7
# 3.2.3 线程的优先级
其实就是CPU调度线程的优先级
java中给线程设置的优先级别有10个级别,从1~10任取一个整数。
如果超出这个范围,会排除参数异常的错误
public static void main(String[] args) throws ExecutionException, InterruptedException {
    Thread t1 = new Thread(() -> {
        for (int i = 0; i < 1000; i++) {
            System.out.println("t1:" + i);
        }
    });
    Thread t2 = new Thread(() -> {
        for (int i = 0; i < 1000; i++) {
            System.out.println("t2:" + i);
        }
    });
    t1.setPriority(1);
    t2.setPriority(10);
    t2.start();
    t1.start();
}
2
3
4
5
6
7
8
9
10
11
12
13
14
15
16
# 3.2.4 线程的让步
可以通过Thread的静态方法yield,让当前线程从运行状态转变为就绪状态。
public static void main(String[] args) throws ExecutionException, InterruptedException {
    Thread t1 = new Thread(() -> {
        for (int i = 0; i < 100; i++) {
            if(i == 50){
                Thread.yield();
            }
            System.out.println("t1:" + i);
        }
    });
    Thread t2 = new Thread(() -> {
        for (int i = 0; i < 100; i++) {
            System.out.println("t2:" + i);
        }
    });
    t2.start();
    t1.start();
}
2
3
4
5
6
7
8
9
10
11
12
13
14
15
16
17
# 3.2.5 线程的休眠
Thread的静态方法,让线程从运行状态转变为等待状态
sleep有两个方法重载:
- 第一个就是native修饰的,让线程转为等待状态的效果
- 第二个是可以传入毫秒和一个纳秒的方法(如果纳秒值大于等于0.5毫秒,就给休眠的毫秒值+1。如果传入的毫秒值是0,纳秒值不为0,就休眠1毫秒)
sleep会抛出一个InterruptedException
public static void main(String[] args) throws InterruptedException {
    System.out.println(System.currentTimeMillis());
    Thread.sleep(1000);
    System.out.println(System.currentTimeMillis());
}
2
3
4
5
# 3.2.6 线程的强占
Thread的非静态方法join方法
需要在某一个线程下去调用这个方法
如果在main线程中调用了t1.join(2000),那么main线程会进入到等待状态,需要等待t1执行2s后,在恢复到就绪状态等待CPU调度。如果在等待期间,t1已经结束了,那么main线程自动变为就绪状态等待CPU调度。
public static void main(String[] args) throws InterruptedException {
    Thread t1 = new Thread(() -> {
        for (int i = 0; i < 10; i++) {
            System.out.println("t1:" + i);
            try {
                Thread.sleep(1000);
            } catch (InterruptedException e) {
                e.printStackTrace();
            }
        }
    });
    t1.start();
    for (int i = 0; i < 10; i++) {
        System.out.println("main:" + i);
        try {
            Thread.sleep(1000);
        } catch (InterruptedException e) {
            e.printStackTrace();
        }
        if (i == 1){
            try {
                t1.join(2000);
            } catch (InterruptedException e) {
                e.printStackTrace();
            }
        }
    }
}
2
3
4
5
6
7
8
9
10
11
12
13
14
15
16
17
18
19
20
21
22
23
24
25
26
27
28
# 3.2.7 守护线程
默认情况下,线程都是非守护线程
JVM会在程序中没有非守护线程时,结束掉当前JVM
主线程默认是非守护线程,如果主线程执行结束,需要查看当前JVM内是否还有非守护线程,如果没有JVM直接停止
public static void main(String[] args) throws InterruptedException {
    Thread t1 = new Thread(() -> {
        for (int i = 0; i < 10; i++) {
            System.out.println("t1:" + i);
            try {
                Thread.sleep(1000);
            } catch (InterruptedException e) {
                e.printStackTrace();
            }
        }
    });
    t1.setDaemon(true);
    t1.start();
}
2
3
4
5
6
7
8
9
10
11
12
13
14
# 3.2.8 线程的等待和唤醒
可以让获取synchronized锁资源的线程通过wait方法进去到锁的等待池,并且会释放锁资源
可以让获取synchronized锁资源的线程,通过notify或者notifyAll方法,将等待池中的线程唤醒,添加到锁池中
notify随机的唤醒等待池中的一个线程到锁池
notifyAll将等待池中的全部线程都唤醒,并且添加到锁池
在调用wait方法和notify以及norifyAll方法时,必须在synchronized修饰的代码块或者方法内部才可以,因为要操作基于某个对象的锁的信息维护。
public static void main(String[] args) throws InterruptedException {
    Thread t1 = new Thread(() -> {
        sync();
    },"t1");

    Thread t2 = new Thread(() -> {
        sync();
    },"t2");
    t1.start();
    t2.start();
    Thread.sleep(12000);
    synchronized (MiTest.class) {
        MiTest.class.notifyAll();
    }
}

public static synchronized void sync()  {
    try {
        for (int i = 0; i < 10; i++) {
            if(i == 5) {
                MiTest.class.wait();
            }
            Thread.sleep(1000);
            System.out.println(Thread.currentThread().getName());
        }
    } catch (InterruptedException e) {
        e.printStackTrace();
    }
}
2
3
4
5
6
7
8
9
10
11
12
13
14
15
16
17
18
19
20
21
22
23
24
25
26
27
28
29
# 3.3 线程的结束方式
线程结束方式很多,最常用就是让线程的run方法结束,无论是return结束,还是抛出异常结束,都可以
# 3.3.1 stop方法(不用)
强制让线程结束,无论你在干嘛,不推荐使用当然当然方式,但是,他确实可以把线程干掉
public static void main(String[] args) throws InterruptedException {
    Thread t1 = new Thread(() -> {
        try {
            Thread.sleep(5000);
        } catch (InterruptedException e) {
            e.printStackTrace();
        }
    });
    t1.start();
    Thread.sleep(500);
    t1.stop();
    System.out.println(t1.getState());
}
2
3
4
5
6
7
8
9
10
11
12
13
# 3.3.2 使用共享变量(很少会用)
这种方式用的也不多,有的线程可能会通过死循环来保证一直运行。
咱们可以通过修改共享变量在破坏死循环,让线程退出循环,结束run方法
static volatile boolean flag = true;

public static void main(String[] args) throws InterruptedException {
    Thread t1 = new Thread(() -> {
        while(flag){
            // 处理任务
        }
        System.out.println("任务结束");
    });
    t1.start();
    Thread.sleep(500);
    flag = false;
}
2
3
4
5
6
7
8
9
10
11
12
13
# 3.3.3 interrupt方式
共享变量方式
public static void main(String[] args) throws InterruptedException {
    // 线程默认情况下,    interrupt标记位:false
    System.out.println(Thread.currentThread().isInterrupted());
    // 执行interrupt之后,再次查看打断信息
    Thread.currentThread().interrupt();
    // interrupt标记位:ture
    System.out.println(Thread.currentThread().isInterrupted());
    // 返回当前线程,并归位为false interrupt标记位:ture
    System.out.println(Thread.interrupted());
    // 已经归位了
    System.out.println(Thread.interrupted());

    // =====================================================
    Thread t1 = new Thread(() -> {
        while(!Thread.currentThread().isInterrupted()){
            // 处理业务
        }
        System.out.println("t1结束");
    });
    t1.start();
    Thread.sleep(500);
    t1.interrupt();
}
2
3
4
5
6
7
8
9
10
11
12
13
14
15
16
17
18
19
20
21
22
23
通过打断WAITING或者TIMED_WAITING状态的线程,从而抛出异常自行处理
这种停止线程方式是最常用的一种,在框架和JUC中也是最常见的
public static void main(String[] args) throws InterruptedException {
    Thread t1 = new Thread(() -> {
        while(true){
            // 获取任务
            // 拿到任务,执行任务
            // 没有任务了,让线程休眠
            try {
                Thread.sleep(1000);
            } catch (InterruptedException e) {
                e.printStackTrace();
                System.out.println("基于打断形式结束当前线程");
                return;
            }
        }
    });
    t1.start();
    Thread.sleep(500);
    t1.interrupt();
}
2
3
4
5
6
7
8
9
10
11
12
13
14
15
16
17
18
19
# 二、并发编程的三大特性
# 一、原子性
# 1.1 什么是并发编程的原子性
JMM(Java Memory Model)。不同的硬件和不同的操作系统在内存上的操作有一定差异的。Java为了解决相同代码在不同操作系统上出现的各种问题,用JMM屏蔽掉各种硬件和操作系统带来的差异。
让Java的并发编程可以做到跨平台。
JMM规定所有变量都会存储在主内存中,在操作的时候,需要从主内存中复制一份到线程内存(CPU内存),在线程内部做计算。然后再写回主内存中(不一定!)。
原子性的定义:原子性指一个操作是不可分割的,不可中断的,一个线程在执行时,另一个线程不会影响到他。
并发编程的原子性用代码阐述:
/**
 * 多线程安全问题
 */
public class Demo_01_Mu_Thread {

    static Integer count = 0;

    public static void increment() {
        count++;
    }

    public static void main(String[] args) throws InterruptedException {
        Thread t1 = new Thread(() -> {
            for (int i = 0; i < 100; i++) {
                increment();
            }
        });

        Thread t2 = new Thread(() -> {
            for (int i = 0; i < 100; i++) {
                increment();
            }
        });

        t1.start();
        t2.start();

        t1.join();
        t2.join();
        System.out.println("count:" + count);
    }
}
2
3
4
5
6
7
8
9
10
11
12
13
14
15
16
17
18
19
20
21
22
23
24
25
26
27
28
29
30
31
32
当前程序:多线程操作共享数据时,预期的结果,与最终的结果不符。
原子性:多线程操作临界资源,预期的结果与最终结果一致。
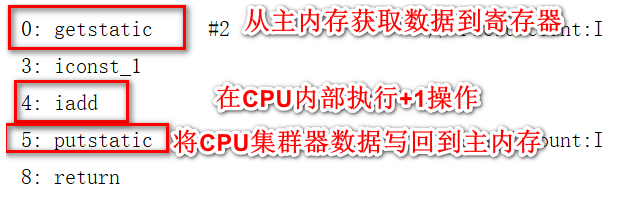
通过对这个程序的分析,可以查看出,++的操作,一共分为了三部,首先是线程从主内存拿到数据保存到CPU的寄存器中,然后在寄存器中进行+1操作,最终将结果写回到主内存当中。
# 1.2 保证并发编程的原子性
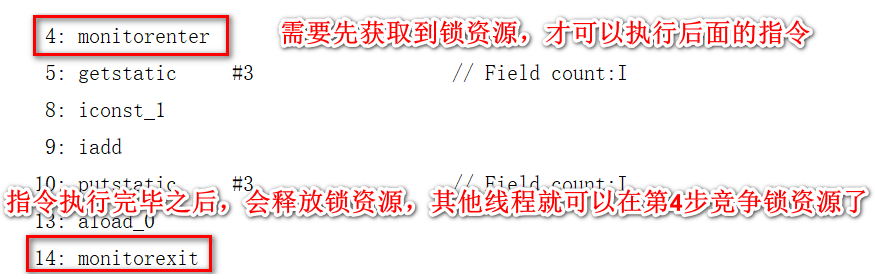
# 1.2.1 synchronized
因为++操作可以从指令中查看到
可以在方法上追加synchronized关键字或者采用同步代码块的形式来保证原子性
public static synchronized void increment() {
    count++;
}
2
3
synchronized可以让避免多线程同时操作临街资源,同一时间点,只会有一个线程正在操作临界资源
# 1.2.2 CAS
**CAS:**compare and swap也就是比较和交换,他是一条CPU的并发原语。
他在替换内存的某个位置的值时,首先查看内存中的值与预期值是否一致,如果一致,执行替换操作。这个操作是一个原子性操作。
Java中基于Unsafe的类提供了对CAS的操作的方法,JVM会帮助我们将方法实现CAS汇编指令。
但是要清楚CAS只是比较和交换,在获取原值的这个操作上,需要你自己实现。
/**
 * CAS
 */
public class Demo_02_CAS {

    static AtomicInteger count = new AtomicInteger(0);


    public static void main(String[] args) throws InterruptedException {
        Thread t1 = new Thread(() -> {
            for (int i = 0; i < 100; i++) {
                count.incrementAndGet();
            }
        });

        Thread t2 = new Thread(() -> {
            for (int i = 0; i < 100; i++) {
                count.incrementAndGet();
            }
        });

        t1.start();
        t2.start();

        t1.join();
        t2.join();
        System.out.println("count:" + count);
    }
}
2
3
4
5
6
7
8
9
10
11
12
13
14
15
16
17
18
19
20
21
22
23
24
25
26
27
28
29
Doug Lea在CAS的基础上帮助我们实现了一些原子类,其中就包括现在看到的AtomicInteger,还有其他很多原子类……
**CAS缺点:**CAS只能保证对一个变量的操作是原子性的,无法实现对多行代码实现原子性。
CAS的问题:
ABA问题:问题如下,可以引入版本号的方式,来解决ABA的问题。Java中提供了一个类在CAS时,针对各个版本追加版本号的操作。 AtomicStampeReference
AtomicStampedReference在CAS时,不但会判断原值,还会比较版本信息。
/**
 * AtomicStampedReference  携带版本信息
 */
public class Demo_03_AtomicStampedReference {

    public static void main(String[] args) {
        AtomicStampedReference<String> reference = new AtomicStampedReference<>("A", 1);

        String oValue = reference.getReference();
        int oVersion = reference.getStamp();

        boolean res = reference.compareAndSet(oValue, "B", oVersion, oVersion + 1);
        System.out.println("res:" + res);

        res = reference.compareAndSet(oValue, "C", oVersion, oVersion + 1);
        System.out.println("res:" + res);
    }
}
1
2
3
4
5
6
7
8
9
10
11
12
13
14
15
16
17
18res:true res:false1
2自旋时间过长问题
- 可以指定CAS一共循环多少次,如果超过这个次数,直接失败/或者挂起线程。(自旋锁、自适应自旋锁)
- 可以在CAS一次失败后,将这个操作暂存起来,后面需要获取结果时,将暂存的操作全部执行,再返回最后的结果。
# 1.2.3 Lock锁
Lock锁是在JDK1.5由Doug Lea研发的,他的性能相比synchronized在JDK1.5的时期,性能好了很多多,但是在JDK1.6对synchronized优化之后,性能相差不大,但是如果涉及并发比较多时,推荐ReentrantLock锁,性能会更好。
实现方式:
/**
 * Lock
 */
public class Demo_04_Lock {

    private static int count;

    private static ReentrantLock lock = new ReentrantLock();

    public static void increment()  {
        lock.lock();
        try {
            count++;
            try {
                Thread.sleep(10);
            } catch (InterruptedException e) {
                e.printStackTrace();
            }
        } finally {
            lock.unlock();
        }


    }

    public static void main(String[] args) throws InterruptedException {
        Thread t1 = new Thread(() -> {
            for (int i = 0; i < 100; i++) {
                increment();
            }
        });
        Thread t2 = new Thread(() -> {
            for (int i = 0; i < 100; i++) {
                increment();
            }
        });
        t1.start();
        t2.start();
        t1.join();
        t2.join();
        System.out.println(count);
    }
}
2
3
4
5
6
7
8
9
10
11
12
13
14
15
16
17
18
19
20
21
22
23
24
25
26
27
28
29
30
31
32
33
34
35
36
37
38
39
40
41
42
43
ReentrantLock可以直接对比synchronized,在功能上来说,都是锁。
但是ReentrantLock的功能性相比synchronized更丰富。
ReentrantLock底层是基于AQS实现的,有一个基于CAS维护的state变量来实现锁的操作。
# 1.2.4 ThreadLocal
ThreadLocal保证原子性的方式,是不让多线程去操作临界资源,让每个线程去操作属于自己的数据
代码实现
/**
 * Lock
 */
public class Demo_05_ThreadLocal {

    static ThreadLocal t1 = new ThreadLocal();
    static ThreadLocal t2 = new ThreadLocal();

    public static void main(String[] args) {
        t1.set("A");
        t2.set("B");

        new Thread(() -> {
            Object t1V = t1.get();
            Object t2V = t1.get();
            System.out.println("t:" + t1V);
            System.out.println("t:" + t2V);
        }).start();

        Object t1V = t1.get();
        Object t2V = t1.get();
        System.out.println("main:" + t1V);
        System.out.println("main:" + t2V);
    }
}
2
3
4
5
6
7
8
9
10
11
12
13
14
15
16
17
18
19
20
21
22
23
24
25
main:A
main:A
t:null
t:null
2
3
4
ThreadLocal实现原理:
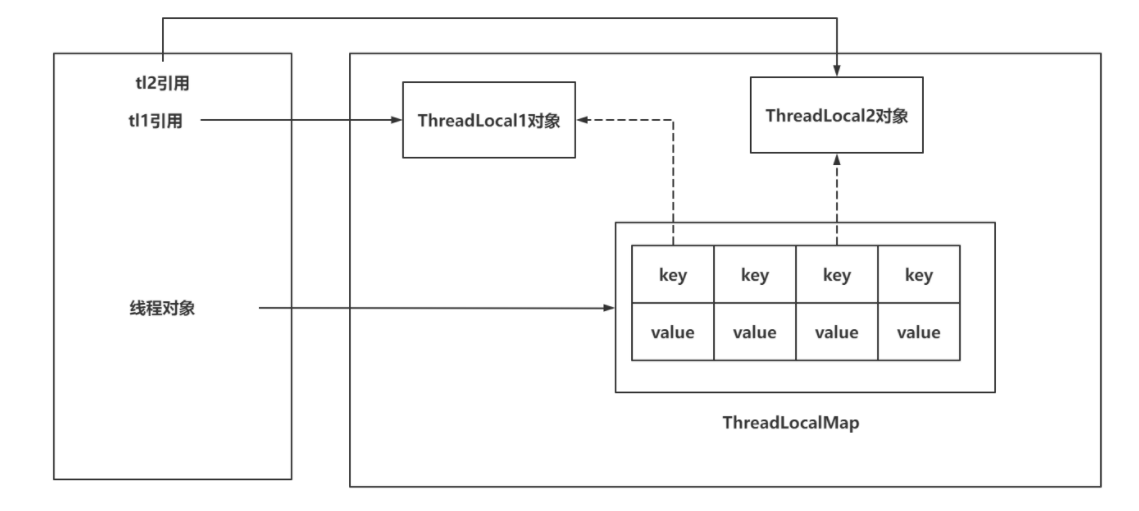
- 每个Thread中都存储着一个成员变量,ThreadLocalMap
- ThreadLocal本身不存储数据,像是一个工具类,基于ThreadLocal去操作ThreadLocalMap
- ThreadLocalMap本身就是基于Entry[]实现的,因为一个线程可以绑定多个ThreadLocal,这样一来,可能需要存储多个数据,所以采用Entry[]的形式实现。
- 每一个现有都自己独立的ThreadLocalMap,再基于ThreadLocal对象本身作为key,对value进行存取
- ThreadLocalMap的key是一个弱引用,弱引用的特点是,即便有弱引用,在GC时,也必须被回收。这里是为了在ThreadLocal对象失去引用后,如果key的引用是强引用,会导致ThreadLocal对象无法被回收
ThreadLocal内存泄漏问题:
如果ThreadLocal引用丢失,key因为弱引用会被GC回收掉,如果同时线程还没有被回收,就会导致内存泄漏,内存中的value无法被回收,同时也无法被获取到。
只需要在使用完毕ThreadLocal对象之后,及时的调用remove方法,移除Entry即可
# 二、可见性
# 2.1 什么是可见性
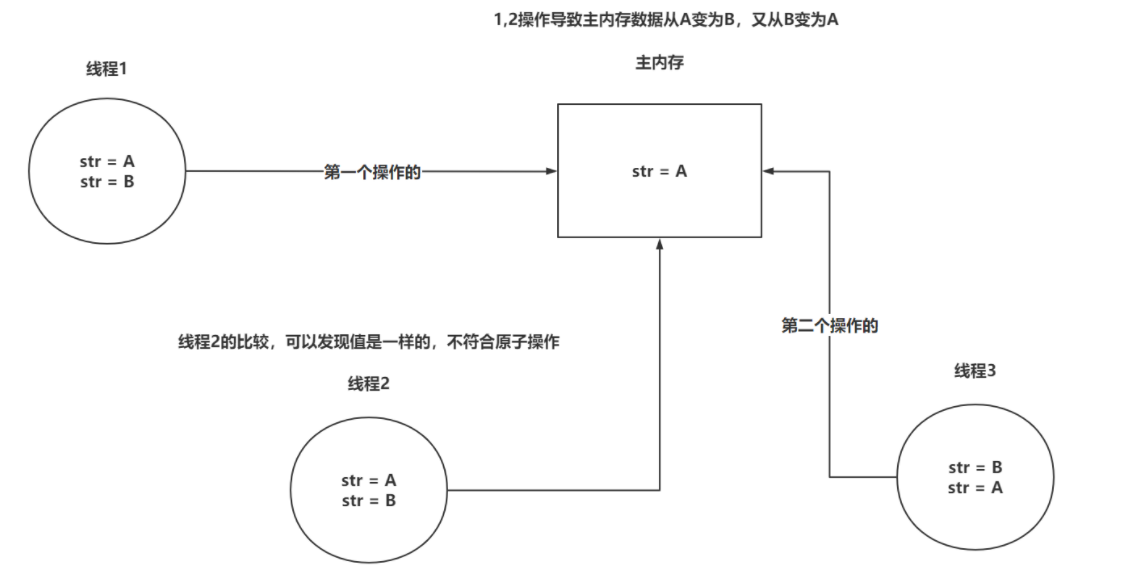
可见性问题是基于CPU位置出现的,CPU处理速度非常快,相对CPU来说,去主内存获取数据这个事情太慢了,CPU就提供了L1,L2,L3的三级缓存,每次去主内存拿完数据后,就会存储到CPU的三级缓存,每次去三级缓存拿数据,效率肯定会提升。
这就带来了问题,现在CPU都是多核,每个线程的工作内存(CPU三级缓存)都是独立的,会告知每个线程中做修改时,只改自己的工作内存,没有及时的同步到主内存,导致数据不一致问题。
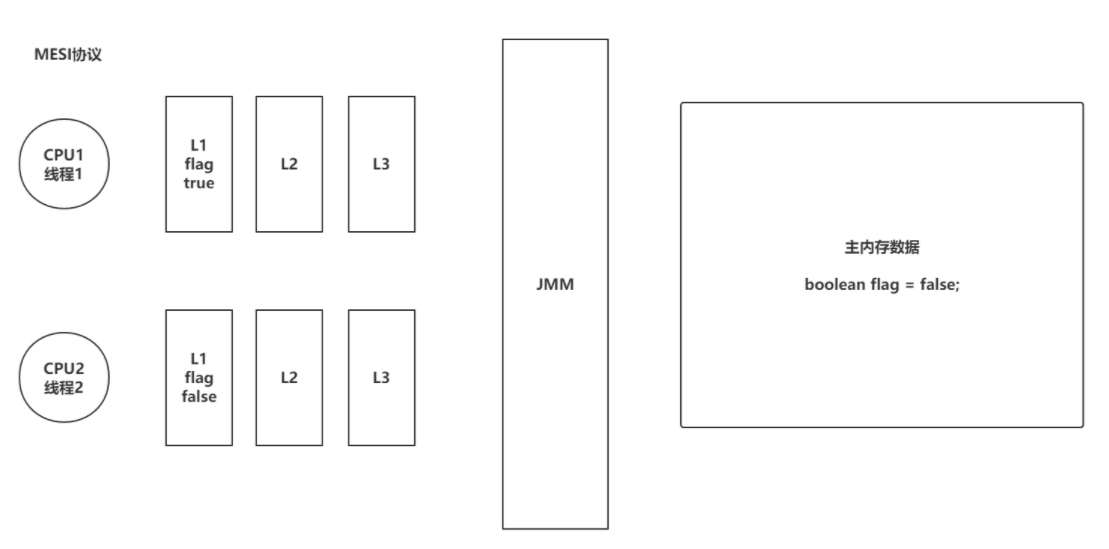
可见性问题的代码逻辑
/**
 * 多线程下可见性问题
 */
public class Demo_06_Visible_Problem {

    private static boolean flag = true;

    public static void main(String[] args) throws InterruptedException {
        new Thread(() -> {
            while (flag) {
                //...
            }
            System.out.println(Thread.currentThread().getName() + ":线程结束");
        }).start();

        Thread.sleep(10);
        flag = false;
        System.out.println("main线程结束~");
    }
}
2
3
4
5
6
7
8
9
10
11
12
13
14
15
16
17
18
19
20
# 2.2 解决可见性的方式
# 2.2.1 volatile
volatile是一个关键字,用来修饰成员变量。
如果属性被volatile修饰,相当于会告诉CPU,对当前属性的操作,不允许使用CPU的缓存,必须去和主内存操作
volatile的内存语义:
- volatile属性被写:当写一个volatile变量,JMM会将当前线程对应的CPU缓存及时的刷新到主内存中
- volatile属性被读:当读一个volatile变量,JMM会将对应的CPU缓存中的内存设置为无效,必须去主内存中重新读取共享变量
其实加了volatile就是告知CPU,对当前属性的读写操作,不允许使用CPU缓存,加了volatile修饰的属性,会在转为汇编之后后,追加一个lock的前缀,CPU执行这个指令时,如果带有lock前缀会做两个事情:
- 将当前处理器缓存行的数据写回到主内存
- 这个写回的数据,在其他的CPU内核的缓存中,直接无效。
总结:volatile就是让CPU每次操作这个数据时,必须立即同步到主内存,以及从主内存读取数据。
/**
 * 多线程下可见性 volatile
 */
public class Demo_07_Visible_Volatile {

    private static volatile boolean flag = true;

    public static void main(String[] args) throws InterruptedException {
        new Thread(() -> {
            while (flag) {
                //...
            }
            System.out.println(Thread.currentThread().getName() + ":线程结束");
        }).start();

        Thread.sleep(10);
        flag = false;
        System.out.println("main线程结束~");
    }
}
2
3
4
5
6
7
8
9
10
11
12
13
14
15
16
17
18
19
20
# 2.2.2 synchronized
synchronized也是可以解决可见性问题的,synchronized的内存语义。
如果涉及到了synchronized的同步代码块或者是同步方法,获取锁资源之后,将内部涉及到的变量从CPU缓存中移除,必须去主内存中重新拿数据,而且在释放锁之后,会立即将CPU缓存中的数据同步到主内存。
/**
 * 多线程下可见性 Synchronized
 */
public class Demo_08_Visible_Synchronized {

    private static boolean flag = true;

    private static Object o = new Object();

    public static void main(String[] args) throws InterruptedException {
        new Thread(() -> {
            while (flag) {
                synchronized (o) {

                }
            }
            System.out.println(Thread.currentThread().getName() + ":线程结束");
        }).start();

        Thread.sleep(10);
        flag = false;
        System.out.println("main线程结束~");
    }
}
2
3
4
5
6
7
8
9
10
11
12
13
14
15
16
17
18
19
20
21
22
23
24
# 2.2.3 Lock
Lock锁保证可见性的方式和synchronized完全不同,synchronized基于他的内存语义,在获取锁和释放锁时,对CPU缓存做一个同步到主内存的操作。
Lock锁是基于volatile实现的。Lock锁内部再进行加锁和释放锁时,会对一个由volatile修饰的state属性进行加减操作。
如果对volatile修饰的属性进行写操作,CPU会执行带有lock前缀的指令,CPU会将修改的数据,从CPU缓存立即同步到主内存,同时也会将其他的属性也立即同步到主内存中。还会将其他CPU缓存行中的这个数据设置为无效,必须重新从主内存中拉取。
/**
 * 多线程下可见性 Lock
 */
public class Demo_09_Visible_Lock {

    private static boolean flag = true;

    private static Lock lock = new ReentrantLock();

    public static void main(String[] args) throws InterruptedException {
        new Thread(() -> {
            while (flag) {
                lock.lock();
                try {
                    //...
                }finally {
                    lock.unlock();
                }
            }
            System.out.println(Thread.currentThread().getName() + ":线程结束");
        }).start();

        Thread.sleep(10);
        flag = false;
        System.out.println("main线程结束~");
    }
}
2
3
4
5
6
7
8
9
10
11
12
13
14
15
16
17
18
19
20
21
22
23
24
25
26
27
# 2.2.4 final
final修饰的属性,在运行期间是不允许修改的,这样一来,就间接的保证了可见性,所有多线程读取final属性,值肯定是一样。
final并不是说每次取数据从主内存读取,他没有这个必要,而且final和volatile是不允许同时修饰一个属性的
final修饰的内容已经不允许再次被写了,而volatile是保证每次读写数据去主内存读取,并且volatile会影响一定的性能,就不需要同时修饰。

# 三、有序性
# 3.1 什么是有序性
在Java中,.java文件中的内容会被编译,在执行前需要再次转为CPU可以识别的指令,CPU在执行这些指令时,为了提升执行效率,在不影响最终结果的前提下(满足一些要求),会对指令进行重排。
指令乱序执行的原因,是为了尽可能的发挥CPU的性能。
Java中的程序是乱序执行的。
Java程序验证乱序执行效果:
static int a,b,x,y;

public static void main(String[] args) throws InterruptedException {
    for (int i = 0; i < Integer.MAX_VALUE; i++) {
        a = 0;
        b = 0;
        x = 0;
        y = 0;

        Thread t1 = new Thread(() -> {
            a = 1;
            x = b;
        });
        Thread t2 = new Thread(() -> {
            b = 1;
            y = a;
        });

        t1.start();
        t2.start();
        t1.join();
        t2.join();

        if(x == 0 && y == 0){
            System.out.println("第" + i + "次,x = "+ x + ",y = " + y);
        }
    }
}
2
3
4
5
6
7
8
9
10
11
12
13
14
15
16
17
18
19
20
21
22
23
24
25
26
27
28
单例模式由于指令重排序可能会出现问题:
线程可能会拿到没有初始化的对象,导致在使用时,可能由于内部属性为默认值,导致出现一些不必要的问题
private static volatile MiTest test;

private MiTest(){}

public static MiTest getInstance(){
    // B
    if(test  == null){
        synchronized (MiTest.class){

            if(test == null){
                // A   ,  开辟空间,test指向地址,初始化
                test = new MiTest();
            }
        }
    }
    return test;
}
2
3
4
5
6
7
8
9
10
11
12
13
14
15
16
17
# 3.2 as-if-serial
as-if-serial语义:
不论指定如何重排序,需要保证单线程的程序执行结果是不变的。
而且如果存在依赖的关系,那么也不可以做指令重排。
// 这种情况肯定不能做指令重排序
int i = 0;
i++;

// 这种情况肯定不能做指令重排序
int j = 200;
j * 100;
j + 100;
// 这里即便出现了指令重排,也不可以影响最终的结果,20100
2
3
4
5
6
7
8
9
# 3.3 happens-before
具体规则:
1. 单线程happen-before原则:在同一个线程中,书写在前面的操作happen-before后面的操作。 2. 锁的happen-before原则:同一个锁的unlock操作happen-before此锁的lock操作。 3. volatile的happen-before原则: 对一个volatile变量的写操作happen-before对此变量的任意操作。 4. happen-before的传递性原则: 如果A操作 happen-before B操作,B操作happen-before C操作,那么A操作happen-before C操作。 5. 线程启动的happen-before原则:同一个线程的start方法happen-before此线程的其它方法。 6. 线程中断的happen-before原则:对线程interrupt方法的调用happen-before被中断线程的检测到中断发送的代码。 7. 线程终结的happen-before原则:线程中的所有操作都happen-before线程的终止检测。 8. 对象创建的happen-before原则:一个对象的初始化完成先于他的finalize方法调用。 JMM只有在不出现上述8中情况时,才不会触发指令重排效果。
不需要过分的关注happens-before原则,只需要可以写出线程安全的代码就可以了。
# 3.4 volatile
如果需要让程序对某一个属性的操作不出现指令重排,除了满足happens-before原则之外,还可以基于volatile修饰属性,从而对这个属性的操作,就不会出现指令重排的问题了。
volatile如何实现的禁止指令重排?
内存屏障概念。将内存屏障看成一条指令。
会在两个操作之间,添加上一道指令,这个指令就可以避免上下执行的其他指令进行重排序。
# 三、锁
# 一、锁的分类
# 1.1 可重入锁、不可重入锁
重入:当前线程获取到A锁,在获取之后尝试再次获取A锁是可以直接拿到的。
不可重入:当前线程获取到A锁,在获取之后尝试再次获取A锁,无法获取到的,因为A锁被当前线程占用着,需要等待自己释放锁再获取锁。
# 1.2 乐观锁、悲观锁
Java中提供的synchronized,ReentrantLock,ReentrantReadWriteLock都是悲观锁。
Java中提供的CAS操作,就是乐观锁的一种实现。
悲观锁:获取不到锁资源时,会将当前线程挂起(进入BLOCKED、WAITING),线程挂起会涉及到用户态和内核的太的切换,而这种切换是比较消耗资源的。
- 用户态:JVM可以自行执行的指令,不需要借助操作系统执行。
- 内核态:JVM不可以自行执行,需要操作系统才可以执行。
乐观锁:获取不到锁资源,可以再次让CPU调度,重新尝试获取锁资源。
Atomic原子性类中,就是基于CAS乐观锁实现的。
# 1.3 公平锁、非公平锁
Java中提供的synchronized只能是非公平锁。
Java中提供的ReentrantLock,ReentrantReadWriteLock可以实现公平锁和非公平锁
公平锁:线程A获取到了锁资源,线程B没有拿到,线程B去排队,线程C来了,锁被A持有,同时线程B在排队。直接排到B的后面,等待B拿到锁资源或者是B取消后,才可以尝试去竞争锁资源。
非公平锁:线程A获取到了锁资源,线程B没有拿到,线程B去排队,线程C来了,先尝试竞争一波
- 拿到锁资源:开心,插队成功。
- 没有拿到锁资源:依然要排到B的后面,等待B拿到锁资源或者是B取消后,才可以尝试去竞争锁资源。
# 1.4 互斥锁、共享锁
Java中提供的synchronized、ReentrantLock是互斥锁。
Java中提供的ReentrantReadWriteLock,有互斥锁也有共享锁。
互斥锁:同一时间点,只会有一个线程持有者当前互斥锁。
共享锁:同一时间点,当前共享锁可以被多个线程同时持有。
# 二、深入synchronized
# 2.1 类锁、对象锁
synchronized的使用一般就是同步方法和同步代码块。
synchronized的锁是基于对象实现的。
如果使用同步方法
static:此时使用的是当前类.class作为锁(类锁)
非static:此时使用的是当前对象做为锁(对象锁)
/**
 * synchronized类锁和对象锁
 */
public class Demo_01_synchronized_Class_Obj {


}

class Test {
    // 类锁 Test.class
    public static synchronized void a() {

    }

    // 对象锁 this
    public synchronized void b() {

    }
}
1
2
3
4
5
6
7
8
9
10
11
12
13
14
15
16
17
18
19
# 2.2 synchronized的优化
在JDK1.5的时候,Doug Lee推出了ReentrantLock,lock的性能远高于synchronized,所以JDK团队就在JDK1.6中,对synchronized做了大量的优化。
锁消除:在synchronized修饰的代码中,如果不存在操作临界资源的情况,会触发锁消除,你即便写了synchronized,他也不会触发。
public synchronized void method(){
    // 没有操作临界资源
    // 此时这个方法的synchronized你可以认为木有~~
}
2
3
4
锁膨胀:如果在一个循环中,频繁的获取和释放锁资源,这样带来的消耗很大,锁膨胀就是将锁的范围扩大,避免频繁的竞争和获取锁资源带来不必要的消耗。
public void method(){
    for(int i = 0;i < 999999;i++){
        synchronized(对象){

        }
    }
    // 这是上面的代码会触发锁膨胀
    synchronized(对象){
        for(int i = 0;i < 999999;i++){

        }
    }
}
2
3
4
5
6
7
8
9
10
11
12
13
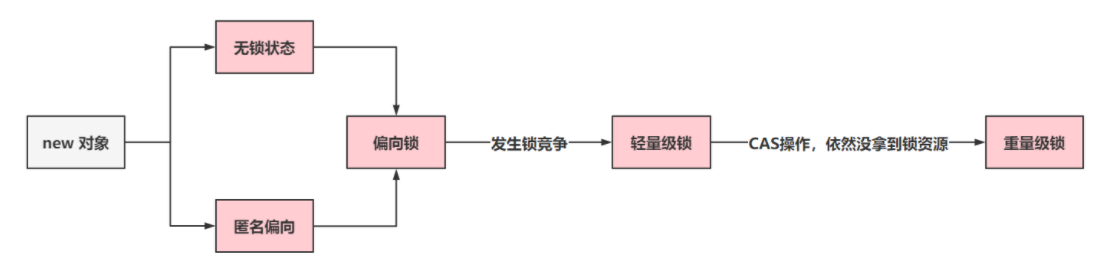
锁升级:ReentrantLock的实现,是先基于乐观锁的CAS尝试获取锁资源,如果拿不到锁资源,才会挂起线程。synchronized在JDK1.6之前,完全就是获取不到锁,立即挂起当前线程,所以synchronized性能比较差。
synchronized就在JDK1.6做了锁升级的优化
- 无锁、匿名偏向:当前对象没有作为锁存在。
- 偏向锁:如果当前锁资源,只有一个线程在频繁的获取和释放,那么这个线程过来,只需要判断,当前指向的线程是否是当前线程 。
- 如果是,直接拿着锁资源走。
- 如果当前线程不是我,基于CAS的方式,尝试将偏向锁指向当前线程。如果获取不到,触发锁升级,升级为轻量级锁。(偏向锁状态出现了锁竞争的情况)
- 轻量级锁:会采用自旋锁的方式去频繁的以CAS的形式获取锁资源(采用的是自适应自旋锁)
- 如果成功获取到,拿着锁资源走
- 如果自旋了一定次数,没拿到锁资源,锁升级。
- 重量级锁:就是最传统的synchronized方式,拿不到锁资源,就挂起当前线程。(用户态&内核态)
- 如果成功获取到,拿着锁资源走
- 如果自旋了一定次数,没拿到锁资源,锁升级。
- 重量级锁:就是最传统的synchronized方式,拿不到锁资源,就挂起当前线程。(用户态&内核态)
# 2.3 synchronized实现原理
synchronized是基于对象实现的。
先要对Java中对象在堆内存的存储有一个了解。
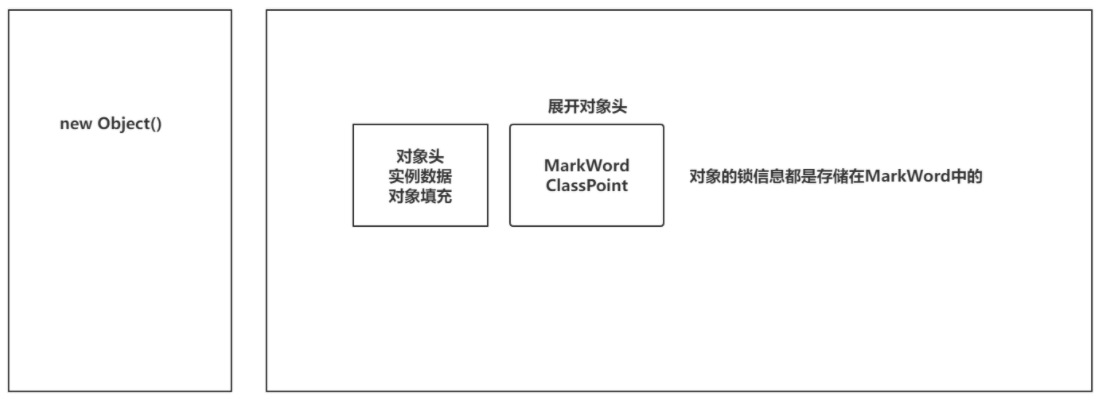
展开MarkWord
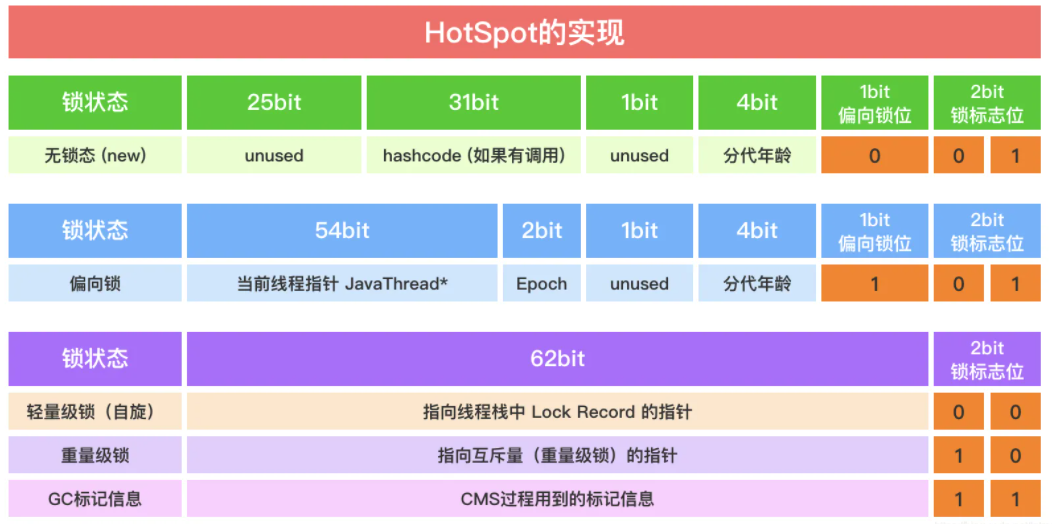
MarkWord中标记着四种锁的信息:无锁、偏向锁、轻量级锁、
# 2.4 synchronized的锁升级
为了可以在Java中看到对象头的MarkWord信息,需要导入依赖
<dependency>
    <groupId>org.openjdk.jol</groupId>
    <artifactId>jol-core</artifactId>
    <version>0.9</version>
</dependency>
2
3
4
5
锁默认情况下,开启了偏向锁延迟。
偏向锁在升级为轻量级锁时,会涉及到偏向锁撤销,需要等到一个安全点(STW),才可以做偏向锁撤销,在明知道有并发情况,就可以选择不开启偏向锁,或者是设置偏向锁延迟开启
因为JVM在启动时,需要加载大量的.class文件到内存中,这个操作会涉及到synchronized的使用,为了避免出现偏向锁撤销操作,JVM启动初期,有一个延迟5s开启偏向锁的操作
如果正常开启偏向锁了,那么不会出现无锁状态,对象会直接变为匿名偏向
/**
 * 锁升级
 */
public class Demo_01_synchronized_Level_Up {
    public static void main(String[] args) throws InterruptedException {
        Thread.sleep(5000);
        Object o = new Object();
        System.out.println(ClassLayout.parseInstance(o).toPrintable());

        new Thread(() -> {

            synchronized (o){
                //t1  - 偏向锁
                System.out.println("t1:" + ClassLayout.parseInstance(o).toPrintable());
            }
        }).start();
        //main - 偏向锁 - 轻量级锁CAS - 重量级锁
        synchronized (o){
            System.out.println("main:" + ClassLayout.parseInstance(o).toPrintable());
        }
    }
}
2
3
4
5
6
7
8
9
10
11
12
13
14
15
16
17
18
19
20
21
22
整个锁升级状态的转变:
Lock Record以及ObjectMonitor存储的内容

# 2.5 重量锁底层ObjectMonitor
需要去找到openjdk,在百度中直接搜索openjdk,第一个链接就是
找到ObjectMonitor的两个文件,hpp,cpp
先查看核心属性:http://hg.openjdk.java.net/jdk8u/jdk8u/hotspot/file/69087d08d473/src/share/vm/runtime/objectMonitor.hpp
ObjectMonitor() {
    _header       = NULL;   // header存储着MarkWord
    _count        = 0;      // 竞争锁的线程个数
    _waiters      = 0,      // wait的线程个数
    _recursions   = 0;      // 标识当前synchronized锁重入的次数
    _object       = NULL;
    _owner        = NULL;   // 持有锁的线程
    _WaitSet      = NULL;   // 保存wait的线程信息,双向链表
    _WaitSetLock  = 0 ;
    _Responsible  = NULL ;
    _succ         = NULL ;
    _cxq          = NULL ;  // 获取锁资源失败后,线程要放到当前的单向链表中
    FreeNext      = NULL ;
    _EntryList    = NULL ;  // _cxq以及被唤醒的WaitSet中的线程,在一定机制下,会放到EntryList中
    _SpinFreq     = 0 ;
    _SpinClock    = 0 ;
    OwnerIsThread = 0 ;
    _previous_owner_tid = 0;
  }
2
3
4
5
6
7
8
9
10
11
12
13
14
15
16
17
18
19
适当的查看几个C++中实现的加锁流程
http://hg.openjdk.java.net/jdk8u/jdk8u/hotspot/file/69087d08d473/src/share/vm/runtime/objectMonitor.cpp
TryLock
int ObjectMonitor::TryLock (Thread * Self) {
   for (;;) {
	  // 拿到持有锁的线程
      void * own = _owner ;
      // 如果有线程持有锁,告辞
      if (own != NULL) return 0 ;
      // 说明没有线程持有锁,own是null,cmpxchg指令就是底层的CAS实现。
      if (Atomic::cmpxchg_ptr (Self, &_owner, NULL) == NULL) {
		 // 成功获取锁资源
         return 1 ;
      }
      // 这里其实重试操作没什么意义,直接返回-1
      if (true) return -1 ;
   }
}
2
3
4
5
6
7
8
9
10
11
12
13
14
15
try_entry
bool ObjectMonitor::try_enter(Thread* THREAD) {
  // 在判断_owner是不是当前线程
  if (THREAD != _owner) {
    // 判断当前持有锁的线程是否是当前线程,说明轻量级锁刚刚升级过来的情况
    if (THREAD->is_lock_owned ((address)_owner)) {
       _owner = THREAD ;
       _recursions = 1 ;
       OwnerIsThread = 1 ;
       return true;
    }
    // CAS操作,尝试获取锁资源
    if (Atomic::cmpxchg_ptr (THREAD, &_owner, NULL) != NULL) {
      // 没拿到锁资源,告辞
      return false;
    }
    // 拿到锁资源
    return true;
  } else {
    // 将_recursions + 1,代表锁重入操作。
    _recursions++;
    return true;
  }
}
2
3
4
5
6
7
8
9
10
11
12
13
14
15
16
17
18
19
20
21
22
23
enter(想方设法拿到锁资源,如果没拿到,挂起扔到_cxq单向链表中)
void ATTR ObjectMonitor::enter(TRAPS) {
  // 拿到当前线程
  Thread * const Self = THREAD ;
  void * cur ;
  // CAS走你,
  cur = Atomic::cmpxchg_ptr (Self, &_owner, NULL) ;
  if (cur == NULL) {
     // 拿锁成功
     return ;
  }
  // 锁重入操作
  if (cur == Self) {
     // TODO-FIXME: check for integer overflow!  BUGID 6557169.
     _recursions ++ ;
     return ;
  }
  //轻量级锁过来的。
  if (Self->is_lock_owned ((address)cur)) {
    _recursions = 1 ;
    _owner = Self ;
    OwnerIsThread = 1 ;
    return ;
  }


  // 走到这了,没拿到锁资源,count++
  Atomic::inc_ptr(&_count);


    for (;;) {
      jt->set_suspend_equivalent();
      // 入队操作,进到cxq中
      EnterI (THREAD) ;
      if (!ExitSuspendEquivalent(jt)) break ;
      _recursions = 0 ;
      _succ = NULL ;
      exit (false, Self) ;
      jt->java_suspend_self();
    }
  }
  // count--
  Atomic::dec_ptr(&_count);

}
2
3
4
5
6
7
8
9
10
11
12
13
14
15
16
17
18
19
20
21
22
23
24
25
26
27
28
29
30
31
32
33
34
35
36
37
38
39
40
41
42
43
44
EnterI
for (;;) {
    // 入队
    node._next = nxt = _cxq ;
    // CAS的方式入队。
    if (Atomic::cmpxchg_ptr (&node, &_cxq, nxt) == nxt) break ;

    // 重新尝试获取锁资源
    if (TryLock (Self) > 0) {
        assert (_succ != Self         , "invariant") ;
        assert (_owner == Self        , "invariant") ;
        assert (_Responsible != Self  , "invariant") ;
        return ;
    }
}
2
3
4
5
6
7
8
9
10
11
12
13
14
# 三、深入ReentrantLock
# 3.1 ReentrantLock和synchronized的区别
核心区别:
- ReentrantLock是个类,synchronized是关键字,当然都是在JVM层面实现互斥锁的方式
效率区别:
- 如果竞争比较激烈,推荐ReentrantLock去实现,不存在锁升级概念。而synchronized是存在锁升级概念的,如果升级到重量级锁,是不存在锁降级的。
底层实现区别:
- 实现原理是不一样,ReentrantLock基于AQS实现的,synchronized是基于ObjectMonitor
功能向的区别:
- ReentrantLock的功能比synchronized更全面。
- ReentrantLock支持公平锁和非公平锁
- ReentrantLock可以指定等待锁资源的时间。
选择哪个:如果你对并发编程特别熟练,推荐使用ReentrantLock,功能更丰富。如果掌握的一般般,使用synchronized会更好
# 3.2 AQS概述
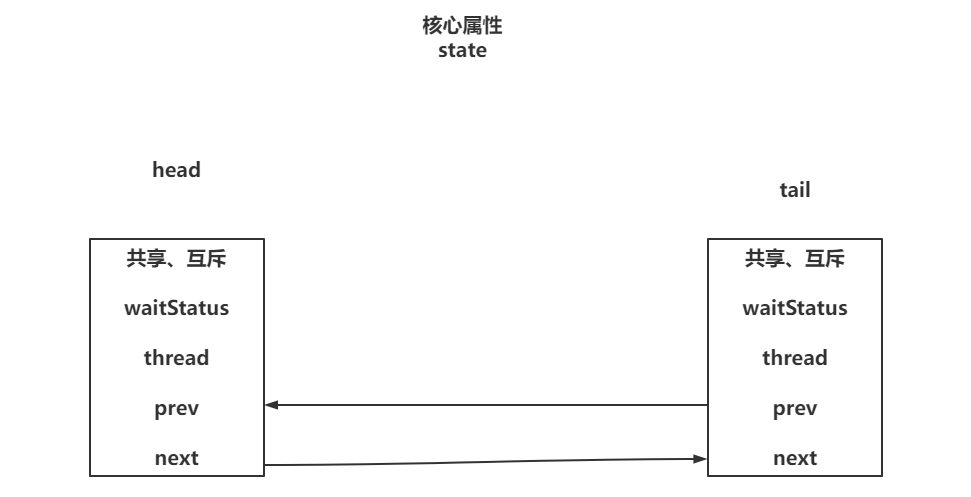
AQS就是AbstractQueuedSynchronizer类,AQS其实就是JUC包下的一个基类,JUC下的很多内容都是基于AQS实现了部分功能,比如ReentrantLock,ThreadPoolExecutor,阻塞队列,CountDownLatch,Semaphore,CyclicBarrier等等都是基于AQS实现。
首先AQS中提供了一个由volatile修饰,并且采用CAS方式修改的int类型的state变量。
其次AQS中维护了一个人双向列表,有head,tail,并且每个节点都是Node对象
    // Wait queue node class
    static final class Node {
        /** Marker to indicate a node is waiting in shared mode */
        static final Node SHARED = new Node();
        /** Marker to indicate a node is waiting in exclusive mode */
        static final Node EXCLUSIVE = null;

        /** waitStatus value to indicate thread has cancelled */
        static final int CANCELLED =  1;
        /** waitStatus value to indicate successor's thread needs unparking */
        static final int SIGNAL    = -1;
        /** waitStatus value to indicate thread is waiting on condition */
        static final int CONDITION = -2;
        /**
         * waitStatus value to indicate the next acquireShared should
         * unconditionally propagate
         */
        static final int PROPAGATE = -3;

        /**
         * Status field, taking on only the values:
         *   SIGNAL:     The successor of this node is (or will soon be)
         *               blocked (via park), so the current node must
         *               unpark its successor when it releases or
         *               cancels. To avoid races, acquire methods must
         *               first indicate they need a signal,
         *               then retry the atomic acquire, and then,
         *               on failure, block.
         *   CANCELLED:  This node is cancelled due to timeout or interrupt.
         *               Nodes never leave this state. In particular,
         *               a thread with cancelled node never again blocks.
         *   CONDITION:  This node is currently on a condition queue.
         *               It will not be used as a sync queue node
         *               until transferred, at which time the status
         *               will be set to 0. (Use of this value here has
         *               nothing to do with the other uses of the
         *               field, but simplifies mechanics.)
         *   PROPAGATE:  A releaseShared should be propagated to other
         *               nodes. This is set (for head node only) in
         *               doReleaseShared to ensure propagation
         *               continues, even if other operations have
         *               since intervened.
         *   0:          None of the above
         *
         * The values are arranged numerically to simplify use.
         * Non-negative values mean that a node doesn't need to
         * signal. So, most code doesn't need to check for particular
         * values, just for sign.
         *
         * The field is initialized to 0 for normal sync nodes, and
         * CONDITION for condition nodes.  It is modified using CAS
         * (or when possible, unconditional volatile writes).
         */
        volatile int waitStatus;

        /**
         * Link to predecessor node that current node/thread relies on
         * for checking waitStatus. Assigned during enqueuing, and nulled
         * out (for sake of GC) only upon dequeuing.  Also, upon
         * cancellation of a predecessor, we short-circuit while
         * finding a non-cancelled one, which will always exist
         * because the head node is never cancelled: A node becomes
         * head only as a result of successful acquire. A
         * cancelled thread never succeeds in acquiring, and a thread only
         * cancels itself, not any other node.
         */
        volatile Node prev;

        /**
         * Link to the successor node that the current node/thread
         * unparks upon release. Assigned during enqueuing, adjusted
         * when bypassing cancelled predecessors, and nulled out (for
         * sake of GC) when dequeued.  The enq operation does not
         * assign next field of a predecessor until after attachment,
         * so seeing a null next field does not necessarily mean that
         * node is at end of queue. However, if a next field appears
         * to be null, we can scan prev's from the tail to
         * double-check.  The next field of cancelled nodes is set to
         * point to the node itself instead of null, to make life
         * easier for isOnSyncQueue.
         */
        volatile Node next;

        /**
         * The thread that enqueued this node.  Initialized on
         * construction and nulled out after use.
         */
        volatile Thread thread;

        /**
         * Link to next node waiting on condition, or the special
         * value SHARED.  Because condition queues are accessed only
         * when holding in exclusive mode, we just need a simple
         * linked queue to hold nodes while they are waiting on
         * conditions. They are then transferred to the queue to
         * re-acquire. And because conditions can only be exclusive,
         * we save a field by using special value to indicate shared
         * mode.
         */
        Node nextWaiter;
    }
2
3
4
5
6
7
8
9
10
11
12
13
14
15
16
17
18
19
20
21
22
23
24
25
26
27
28
29
30
31
32
33
34
35
36
37
38
39
40
41
42
43
44
45
46
47
48
49
50
51
52
53
54
55
56
57
58
59
60
61
62
63
64
65
66
67
68
69
70
71
72
73
74
75
76
77
78
79
80
81
82
83
84
85
86
87
88
89
90
91
92
93
94
95
96
97
98
99
100
101
AQS内部结构和属性
# 3.2 加锁流程源码剖析
# 3.2.1 加锁流程概述
这个是非公平锁的流程
# 3.2.2 三种加锁源码分析
# 3.2.2.1 lock方法
执行lock方法后,公平锁和非公平锁的执行套路不一样
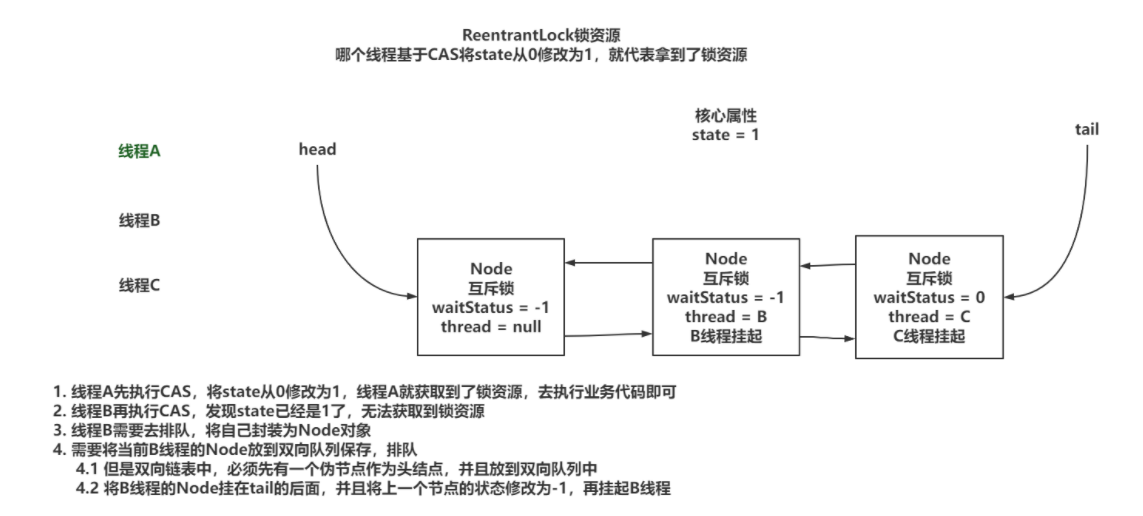
// 非公平锁
final void lock() {
    // 上来就先基于CAS的方式,尝试将state从0改为1
    if (compareAndSetState(0, 1))
        // 获取锁资源成功,会将当前线程设置到exclusiveOwnerThread属性,代表是当前线程持有着锁资源
        setExclusiveOwnerThread(Thread.currentThread());
    else
        // 执行acquire,尝试获取锁资源
        acquire(1);
}

// 公平锁
final void lock() {
    //  执行acquire,尝试获取锁资源
    acquire(1);
}
1
2
3
4
5
6
7
8
9
10
11
12
13
14
15
16acquire方法,是公平锁和非公平锁的逻辑一样
public final void acquire(int arg) {
    // tryAcquire:再次查看,当前线程是否可以尝试获取锁资源
    if (!tryAcquire(arg) &&
        // 没有拿到锁资源
        // addWaiter(Node.EXCLUSIVE):将当前线程封装为Node节点,插入到AQS的双向链表的结尾
        // acquireQueued:查看我是否是第一个排队的节点,如果是可以再次尝试获取锁资源,如果长时间拿不到,挂起线程
        // 如果不是第一个排队的额节点,就尝试挂起线程即可
        acquireQueued(addWaiter(Node.EXCLUSIVE), arg))
        // 中断线程的操作
        selfInterrupt();
}
1
2
3
4
5
6
7
8
9
10
11tryAcquire方法竞争锁最资源的逻辑,分为公平锁和非公平锁
// 非公平锁实现
final boolean nonfairTryAcquire(int acquires) {
    // 获取当前线程
    final Thread current = Thread.currentThread();
    // 获取了state熟属性
    int c = getState();
    // 判断state当前是否为0,之前持有锁的线程释放了锁资源
    if (c == 0) {
        // 再次抢一波锁资源
        if (compareAndSetState(0, acquires)) {
            setExclusiveOwnerThread(current);
            // 拿锁成功返回true
            return true;
        }
    }
    // 不是0,有线程持有着锁资源,如果是,证明是锁重入操作
    else if (current == getExclusiveOwnerThread()) {
        // 将state + 1
        int nextc = c + acquires;
        if (nextc < 0) // 说明对重入次数+1后,超过了int正数的取值范围
            // 01111111 11111111 11111111 11111111
            // 10000000 00000000 00000000 00000000
            // 说明重入的次数超过界限了。
            throw new Error("Maximum lock count exceeded");
        // 正常的将计算结果,复制给state
        setState(nextc);
        // 锁重入成功
        return true;
    }
    // 返回false
    return false;
}

 // 公平锁实现
   protected final boolean tryAcquire(int acquires) {
       // 获取当前线程
       final Thread current = Thread.currentThread();
       // ....
       int c = getState();
       if (c == 0) {
           // 查看AQS中是否有排队的Node
           // 没人排队抢一手 。有人排队,如果我是第一个,也抢一手
           if (!hasQueuedPredecessors() &&
               // 抢一手~
               compareAndSetState(0, acquires)) {
               setExclusiveOwnerThread(current);
               return true;
           }
       }
       // 锁重入~~~
       else if (current == getExclusiveOwnerThread()) {
           int nextc = c + acquires;
           if (nextc < 0)
               throw new Error("Maximum lock count exceeded");
           setState(nextc);
           return true;
       }
       return false;
   }

   // 查看是否有线程在AQS的双向队列中排队
   // 返回false,代表没人排队
   public final boolean hasQueuedPredecessors() {
       // 头尾节点
       Node t = tail;
       Node h = head;
       // s为头结点的next节点
       Node s;
       // 如果头尾节点相等,证明没有线程排队,直接去抢占锁资源
       return h != t &&
           // s节点不为null,并且s节点的线程为当前线程(排在第一名的是不是我)
           (s == null || s.thread != Thread.currentThread());
   }
1
2
3
4
5
6
7
8
9
10
11
12
13
14
15
16
17
18
19
20
21
22
23
24
25
26
27
28
29
30
31
32
33
34
35
36
37
38
39
40
41
42
43
44
45
46
47
48
49
50
51
52
53
54
55
56
57
58
59
60
61
62
63
64
65
66
67
68
69
70
71
72
73addWaite方法,将没有拿到锁资源的线程扔到AQS队列中去排队
// 没有拿到锁资源,过来排队,  mode:代表互斥锁
   private Node addWaiter(Node mode) {
       // 将当前线程封装为Node,
       Node node = new Node(Thread.currentThread(), mode);
       // 拿到尾结点
       Node pred = tail;
       // 如果尾结点不为null
       if (pred != null) {
           // 当前节点的prev指向尾结点
           node.prev = pred;
           // 以CAS的方式,将当前线程设置为tail节点
           if (compareAndSetTail(pred, node)) {
               // 将之前的尾结点的next指向当前节点
               pred.next = node;
               return node;
           }
       }
       // 如果CAS失败,以死循环的方式,保证当前线程的Node一定可以放到AQS队列的末尾
       enq(node);
       return node;
   }

   private Node enq(final Node node) {
       for (;;) {
           // 拿到尾结点
           Node t = tail;
           // 如果尾结点为空,AQS中一个节点都没有,构建一个伪节点,作为head和tail
           if (t == null) {
               if (compareAndSetHead(new Node()))
                   tail = head;
           } else {
               // 比较熟悉了,以CAS的方式,在AQS中有节点后,插入到AQS队列的末尾
               node.prev = t;
               if (compareAndSetTail(t, node)) {
                   t.next = node;
                   return t;
               }
           }
       }
   }
1
2
3
4
5
6
7
8
9
10
11
12
13
14
15
16
17
18
19
20
21
22
23
24
25
26
27
28
29
30
31
32
33
34
35
36
37
38
39
40acquireQueued方法,判断当前线程是否还能再次尝试获取锁资源,如果不能再次获取锁资源,或者又没获取到,尝试将当前线程挂起
// 当前没有拿到锁资源后,并且到AQS排队了之后触发的方法。  中断操作这里不用考虑
final boolean acquireQueued(final Node node, int arg) {
    // 不考虑中断
    // failed:获取锁资源是否失败(这里简单掌握落地,真正触发的,还是tryLock和lockInterruptibly)
    boolean failed = true;
    try {
        boolean interrupted = false;
        // 死循环…………
        for (;;) {
            // 拿到当前节点的前继节点
            final Node p = node.predecessor();
            // 前继节点是否是head,如果是head,再次执行tryAcquire尝试获取锁资源。
            if (p == head && tryAcquire(arg)) {
                // 获取锁资源成功
                // 设置头结点为当前获取锁资源成功Node,并且取消thread信息
                setHead(node);
                // help GC
                p.next = null;
                // 获取锁失败标识为false
                failed = false;
                return interrupted;
            }
            // 没拿到锁资源……
            // shouldParkAfterFailedAcquire:基于上一个节点转改来判断当前节点是否能够挂起线程,如果可以返回true,
            // 如果不能,就返回false,继续下次循环
            if (shouldParkAfterFailedAcquire(p, node) &&
                // 这里基于Unsafe类的park方法,将当前线程挂起
                parkAndCheckInterrupt())
                interrupted = true;
        }
    } finally {
        if (failed)
            // 在lock方法中,基本不会执行。
            cancelAcquire(node);
    }
}
// 获取锁资源成功后,先执行setHead
private void setHead(Node node) {
    // 当前节点作为头结点  伪
    head = node;
    // 头结点不需要线程信息
    node.thread = null;
    node.prev = null;
}

// 当前Node没有拿到锁资源,或者没有资格竞争锁资源,看一下能否挂起当前线程
private static boolean shouldParkAfterFailedAcquire(Node pred, Node node) {
    // -1,SIGNAL状态:代表当前节点的后继节点,可以挂起线程,后续我会唤醒我的后继节点
    // 1,CANCELLED状态:代表当前节点以及取消了
    int ws = pred.waitStatus;
    if (ws == Node.SIGNAL)
        // 上一个节点为-1之后,当前节点才可以安心的挂起线程
        return true;
    if (ws > 0) {
        // 如果当前节点的上一个节点是取消状态,我需要往前找到一个状态不为1的Node,作为他的next节点
        // 找到状态不为1的节点后,设置一下next和prev
        do {
            node.prev = pred = pred.prev;
        } while (pred.waitStatus > 0);
        pred.next = node;
    } else {
        // 上一个节点的状态不是1或者-1,那就代表节点状态正常,将上一个节点的状态改为-1
        compareAndSetWaitStatus(pred, ws, Node.SIGNAL);
    }
    return false;
}
1
2
3
4
5
6
7
8
9
10
11
12
13
14
15
16
17
18
19
20
21
22
23
24
25
26
27
28
29
30
31
32
33
34
35
36
37
38
39
40
41
42
43
44
45
46
47
48
49
50
51
52
53
54
55
56
57
58
59
60
61
62
63
64
65
66
# 3.2.2.2 tryLock方法
tryLock();
// tryLock方法,无论公平锁还有非公平锁。都会走非公平锁抢占锁资源的操作
// 就是拿到state的值, 如果是0,直接CAS浅尝一下
// state 不是0,那就看下是不是锁重入操作
// 如果没抢到,或者不是锁重入操作,告辞,返回false
public boolean tryLock() {
    // 非公平锁的竞争锁操作
    return sync.nonfairTryAcquire(1);
}
final boolean nonfairTryAcquire(int acquires) {
    final Thread current = Thread.currentThread();
    int c = getState();
    if (c == 0) {
        if (compareAndSetState(0, acquires)) {
            setExclusiveOwnerThread(current);
            return true;
        }
    }
    else if (current == getExclusiveOwnerThread()) {
        int nextc = c + acquires;
        if (nextc < 0) // overflow
            throw new Error("Maximum lock count exceeded");
        setState(nextc);
        return true;
    }
    return false;
}
1
2
3
4
5
6
7
8
9
10
11
12
13
14
15
16
17
18
19
20
21
22
23
24
25
26tryLock(time,unit)
第一波分析,类似的代码:
// tryLock(time,unit)执行的方法
public final boolean tryAcquireNanos(int arg, long nanosTimeout)throws InterruptedException {
    // 线程的中断标记位,是不是从false,别改为了true,如果是,直接抛异常
    if (Thread.interrupted())
        throw new InterruptedException();
    // tryAcquire分为公平和非公平锁两种执行方式,如果拿锁成功, 直接告辞,
    return tryAcquire(arg) ||
        // 如果拿锁失败,在这要等待指定时间
        doAcquireNanos(arg, nanosTimeout);
}

private boolean doAcquireNanos(int arg, long nanosTimeout)
        throws InterruptedException {
    // 如果等待时间是0秒,直接告辞,拿锁失败
    if (nanosTimeout <= 0L)
        return false;
    // 设置结束时间。
    final long deadline = System.nanoTime() + nanosTimeout;
    // 先扔到AQS队列
    final Node node = addWaiter(Node.EXCLUSIVE);
    // 拿锁失败,默认true
    boolean failed = true;
    try {
        for (;;) {
            // 如果在AQS中,当前node是head的next,直接抢锁
            final Node p = node.predecessor();
            if (p == head && tryAcquire(arg)) {
                setHead(node);
                p.next = null; // help GC
                failed = false;
                return true;
            }
            // 结算剩余的可用时间
            nanosTimeout = deadline - System.nanoTime();
            // 判断是否是否用尽的时间
            if (nanosTimeout <= 0L)
                return false;
            // shouldParkAfterFailedAcquire:根据上一个节点来确定现在是否可以挂起线程
            if (shouldParkAfterFailedAcquire(p, node) &&
                // 避免剩余时间太少,如果剩余时间少就不用挂起线程
                nanosTimeout > spinForTimeoutThreshold)
                // 如果剩余时间足够,将线程挂起剩余时间
                LockSupport.parkNanos(this, nanosTimeout);
            // 如果线程醒了,查看是中断唤醒的,还是时间到了唤醒的。
            if (Thread.interrupted())
                // 是中断唤醒的!
                throw new InterruptedException();
        }
    } finally {
        if (failed)
            cancelAcquire(node);
    }
}
1
2
3
4
5
6
7
8
9
10
11
12
13
14
15
16
17
18
19
20
21
22
23
24
25
26
27
28
29
30
31
32
33
34
35
36
37
38
39
40
41
42
43
44
45
46
47
48
49
50
51
52
53取消节点分析:

// 取消在AQS中排队的Node
private void cancelAcquire(Node node) {
    // 如果当前节点为null,直接忽略。
    if (node == null)
        return;
    //1. 线程设置为null
    node.thread = null;

    //2. 往前跳过被取消的节点,找到一个有效节点
    Node pred = node.prev;
    while (pred.waitStatus > 0)
        node.prev = pred = pred.prev;

    //3. 拿到了上一个节点之前的next
    Node predNext = pred.next;

    //4. 当前节点状态设置为1,代表节点取消
    node.waitStatus = Node.CANCELLED;

    // 脱离AQS队列的操作
    // 当前Node是尾结点,将tail从当前节点替换为上一个节点
    if (node == tail && compareAndSetTail(node, pred)) {
        compareAndSetNext(pred, predNext, null);
    } else {
        // 到这上面的操作CAS操作失败
        int ws = pred.waitStatus;
        // 不是head的后继节点
        if (pred != head &&
            // 拿到上一个节点的状态,只要上一个节点的状态不是取消状态,就改为-1
            (ws == Node.SIGNAL || (ws <= 0 && compareAndSetWaitStatus(pred, ws, Node.SIGNAL)))
            && pred.thread != null) {
            // 上面的判断都是为了避免后面节点无法被唤醒。
            // 前继节点是有效节点,可以唤醒后面的节点
            Node next = node.next;
            if (next != null && next.waitStatus <= 0)
                compareAndSetNext(pred, predNext, next);
        } else {
            // 当前节点是head的后继节点
            unparkSuccessor(node);
        }

        node.next = node; // help GC
    }
}
1
2
3
4
5
6
7
8
9
10
11
12
13
14
15
16
17
18
19
20
21
22
23
24
25
26
27
28
29
30
31
32
33
34
35
36
37
38
39
40
41
42
43
44
# 3.2.2.3 lockInterruptibly方法
// 这个是lockInterruptibly和tryLock(time,unit)唯一的区别
// lockInterruptibly,拿不到锁资源,就死等,等到锁资源释放后,被唤醒,或者是被中断唤醒
private void doAcquireInterruptibly(int arg) throws InterruptedException {
    final Node node = addWaiter(Node.EXCLUSIVE);
    boolean failed = true;
    try {
        for (;;) {
            final Node p = node.predecessor();
            if (p == head && tryAcquire(arg)) {
                setHead(node);
                p.next = null; // help GC
                failed = false;
                return;
            }
            if (shouldParkAfterFailedAcquire(p, node) && parkAndCheckInterrupt())
                // 中断唤醒抛异常!
                throw new InterruptedException();
        }
    } finally {
        if (failed)
            cancelAcquire(node);
    }
}

private final boolean parkAndCheckInterrupt() {
    LockSupport.park(this);
    // 这个方法可以确认,当前挂起的线程,是被中断唤醒的,还是被正常唤醒的。
    // 中断唤醒,返回true,如果是正常唤醒,返回false
    return Thread.interrupted();
}
2
3
4
5
6
7
8
9
10
11
12
13
14
15
16
17
18
19
20
21
22
23
24
25
26
27
28
29
30
# 3.3 释放锁流程源码剖析
# 3.3.1 释放锁流程概述
# 3.3.2 释放锁源码分析
public void unlock() {
    // 释放锁资源不分为公平锁和非公平锁,都是一个sync对象
    sync.release(1);
}

// 释放锁的核心流程
public final boolean release(int arg) {
    // 核心释放锁资源的操作之一
    if (tryRelease(arg)) {
        // 如果锁已经释放掉了,走这个逻辑
        Node h = head;
        // h不为null,说明没有排队的
        // 如果h的状态不为0(为-1),说明后面有排队的Node,并且线程已经挂起了。
        if (h != null && h.waitStatus != 0)
            // 唤醒排队的线程
            unparkSuccessor(h);
        return true;
    }
    return false;
}
// ReentrantLock释放锁资源操作
protected final boolean tryRelease(int releases) {
    // 拿到state - 1(并没有赋值给state)
    int c = getState() - releases;
    // 判断当前持有锁的线程是否是当前线程,如果不是,直接抛出异常
    if (Thread.currentThread() != getExclusiveOwnerThread())
        throw new IllegalMonitorStateException();
    // free,代表当前锁资源是否释放干净了。
    boolean free = false;
    if (c == 0) {
        // 如果state - 1后的值为0,代表释放干净了。
        free = true;
        // 将持有锁的线程置位null
        setExclusiveOwnerThread(null);
    }
    // 将c设置给state
    setState(c);
    // 锁资源释放干净返回true,否则返回false
    return free;
}

// 唤醒后面排队的Node
private void unparkSuccessor(Node node) {
    // 拿到头节点状态
    int ws = node.waitStatus;
    if (ws < 0)
        // 先基于CAS,将节点状态从-1,改为0
        compareAndSetWaitStatus(node, ws, 0);
    // 拿到头节点的后续节点。
    Node s = node.next;
    // 如果后续节点为null或者,后续节点的状态为1,代表节点取消了。
    if (s == null || s.waitStatus > 0) {
        s = null;
        // 如果后续节点为null,或者后续节点状态为取消状态,从后往前找到一个有效节点环境
        for (Node t = tail; t != null && t != node; t = t.prev)
            // 从后往前找到状态小于等于0的节点
            // 找到离head最新的有效节点,并赋值给s
            if (t.waitStatus <= 0)
                s = t;
    }
    // 只要找到了这个需要被唤醒的节点,执行unpark唤醒
    if (s != null)
        LockSupport.unpark(s.thread);
}
2
3
4
5
6
7
8
9
10
11
12
13
14
15
16
17
18
19
20
21
22
23
24
25
26
27
28
29
30
31
32
33
34
35
36
37
38
39
40
41
42
43
44
45
46
47
48
49
50
51
52
53
54
55
56
57
58
59
60
61
62
63
64
# 深入ReentrantReadWriteLock
# 一、为什么要出现读写锁
synchronized和ReentrantLock都是互斥锁。
如果说有一个操作读多些少的,还要保证线程安全的话,如果采用上面两种互斥锁,效率方面肯定是很低的。
在这种情况下,咱们就可以使用ReentrantReadWriteLock读写锁去实现。
读读之间是不互斥的,可以读和读操作并发执行。
但是如果涉及到了写操作,那么还得是互斥的操作。
public class Demo_04_ReentryReadWriteLock {

    static ReentrantReadWriteLock lock = new ReentrantReadWriteLock();

    static ReentrantReadWriteLock.ReadLock readLock = lock.readLock();

    static ReentrantReadWriteLock.WriteLock writeLock = lock.writeLock();

    public static void main(String[] args) throws InterruptedException {

        new Thread(() -> {
            readLock.lock();
            try {
                System.out.println("子线程");
                Thread.sleep(5000);
            } catch (InterruptedException e) {
                e.printStackTrace();
            } finally {
                readLock.unlock();
            }
        }).start();

        Thread.sleep(1000);
        readLock.lock();
        try {
            System.out.println("主线程");
        }finally {
            readLock.unlock();
        }
    }
}
2
3
4
5
6
7
8
9
10
11
12
13
14
15
16
17
18
19
20
21
22
23
24
25
26
27
28
29
30
31
# 二、读写锁的实现原理
ReentrantReadWriteLock还是基于AQS实现的,还是对state进行操作,拿到锁资源就去干活,如果没有拿到,依然去AQS队列中排队。
读锁操作:基于state的高16位进行操作。
写锁操作:基于state的低16为进行操作。
ReentrantReadWriteLock依然是可重入锁。
写锁重入:读写锁中的写锁的重入方式,基本和ReentrantLock一致,没有什么区别,依然是对state进行+1操作即可,只要确认持有锁资源的线程,是当前写锁线程即可。只不过之前ReentrantLock的重入次数是state的正数取值范围,但是读写锁中写锁范围就变小了。
读锁重入:因为读锁是共享锁。读锁在获取锁资源操作时,是要对state的高16位进行 + 1操作。因为读锁是共享锁,所以同一时间会有多个读线程持有读锁资源。这样一来,多个读操作在持有读锁时,无法确认每个线程读锁重入的次数。为了去记录读锁重入的次数,每个读操作的线程,都会有一个ThreadLocal记录锁重入的次数。
写锁的饥饿问题:读锁是共享锁,当有线程持有读锁资源时,再来一个线程想要获取读锁,直接对state修改即可。在读锁资源先被占用后,来了一个写锁资源,此时,大量的需要获取读锁的线程来请求锁资源,如果可以绕过写锁,直接拿资源,会造成写锁长时间无法获取到写锁资源。
读锁在拿到锁资源后,如果再有读线程需要获取读锁资源,需要去AQS队列排队。如果队列的前面需要写锁资源的线程,那么后续读线程是无法拿到锁资源的。持有读锁的线程,只会让写锁线程之前的读线程拿到锁资源
# 三、写锁分析
# 3.1 写锁加锁流程概述

# 3.2 写锁加锁源码分析
写锁加锁流程
// 写锁加锁的入口
public void lock() {
    sync.acquire(1);
}

// 阿巴阿巴!!
public final void acquire(int arg) {
    if (!tryAcquire(arg) &&
        acquireQueued(addWaiter(Node.EXCLUSIVE), arg))
        selfInterrupt();
}

// 读写锁的写锁实现tryAcquire
protected final boolean tryAcquire(int acquires) {
    // 拿到当前线程
    Thread current = Thread.currentThread();
    // 拿到state的值
    int c = getState();
    // 得到state低16位的值
    int w = exclusiveCount(c);
    // 判断是否有线程持有着锁资源
    if (c != 0) {
        // 当前没有线程持有写锁,读写互斥,告辞。
        // 有线程持有写锁,持有写锁的线程不是当前线程,不是锁重入,告辞。
        if (w == 0 || current != getExclusiveOwnerThread())
            return false;
        // 当前线程持有写锁。 锁重入。
        if (w + exclusiveCount(acquires) > MAX_COUNT)
            throw new Error("Maximum lock count exceeded");
        // 没有超过锁重入的次数,正常 + 1
        setState(c + acquires);
        return true;
    }
    // 尝试获取锁资源
    if (writerShouldBlock() ||
        // CAS拿锁
        !compareAndSetState(c, c + acquires))
        return false;
    // 拿锁成功,设置占有互斥锁的线程
    setExclusiveOwnerThread(current);
    // 返回true
    return true;
}

// ================================================================
// 这个方法是将state的低16位的值拿到
int w = exclusiveCount(c);
state & ((1 << 16) - 1)
00000000 00000000 00000000 00000001    ==   1
00000000 00000001 00000000 00000000    ==   1 << 16
00000000 00000000 11111111 11111111    ==   (1 << 16) - 1
&运算,一个为0,必然为0,都为1,才为1
// ================================================================
// writerShouldBlock方法查看公平锁和非公平锁的效果
// 非公平锁直接返回false执行CAS尝试获取锁资源
// 公平锁需要查看是否有排队的,如果有排队的,我是否是head的next
2
3
4
5
6
7
8
9
10
11
12
13
14
15
16
17
18
19
20
21
22
23
24
25
26
27
28
29
30
31
32
33
34
35
36
37
38
39
40
41
42
43
44
45
46
47
48
49
50
51
52
53
54
55
56
# 3.3 写锁释放锁流程概述&释放锁源码
释放的流程和ReentrantLock一致,只是在判断释放是否干净时,判断低16位的值
// 写锁释放锁的tryRelease方法
protected final boolean tryRelease(int releases) {
    // 判断当前持有写锁的线程是否是当前线程
    if (!isHeldExclusively())
        throw new IllegalMonitorStateException();
    // 获取state - 1
    int nextc = getState() - releases;
    // 判断低16位结果是否为0,如果为0,free设置为true
    boolean free = exclusiveCount(nextc) == 0;
    if (free)
        // 将持有锁的线程设置为null
        setExclusiveOwnerThread(null);
    // 设置给state
    setState(nextc);
    // 释放干净,返回true。  写锁有冲入,这里需要返回false,不去释放排队的Node
    return free;
}
2
3
4
5
6
7
8
9
10
11
12
13
14
15
16
17
# 四、读锁分析
# 4.1 读锁加锁流程概述
1、分析读锁加速的基本流程
2、分析读锁的可重入锁实现以及优化
3、解决ThreadLocal内存泄漏问题
4、读锁获取锁自后,如果唤醒AQS中排队的读线程
# 4.1.1 基础读锁流程
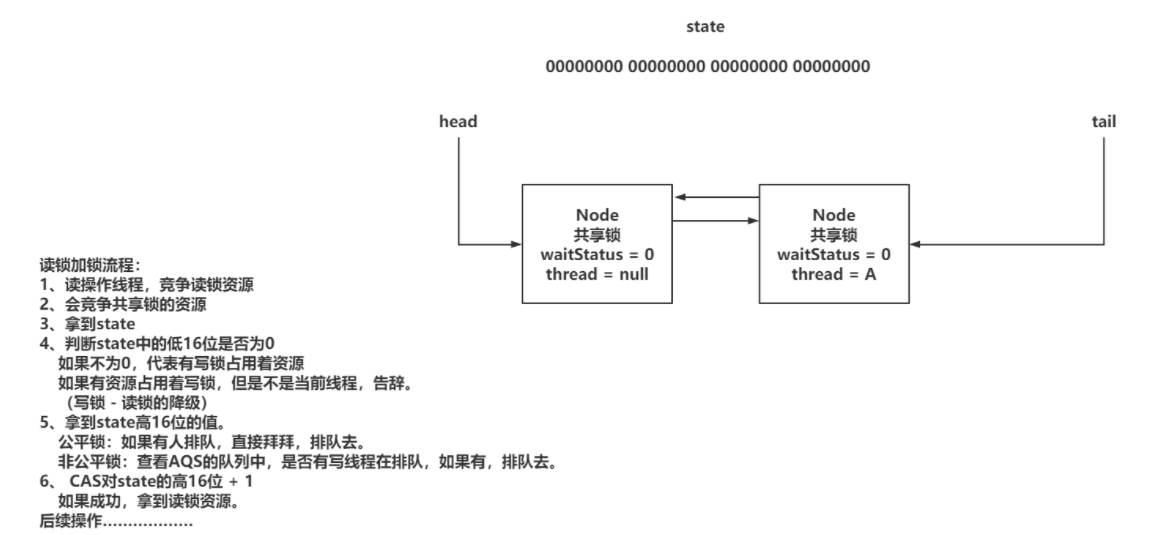
针对上述简单逻辑的源码分析
// 读锁加锁的方法入口
public final void acquireShared(int arg) {
    // 竞争锁资源滴干活
    if (tryAcquireShared(arg) < 0)
        // 没拿到锁资源,去排队
        doAcquireShared(arg);
}

// 读锁竞争锁资源的操作
protected final int tryAcquireShared(int unused) {
    // 拿到当前线程
    Thread current = Thread.currentThread();
    // 拿到state
    int c = getState();
    // 拿到state的低16位,判断 != 0,有写锁占用着锁资源
    // 并且,当前占用锁资源的线程不是当前线程
    if (exclusiveCount(c) != 0 && getExclusiveOwnerThread() != current)
        // 写锁被其他线程占用,无法获取读锁,直接返回 -1,去排队
        return -1;
    // 没有线程持有写锁、当前线程持有写锁
    // 获取读锁的信息,state的高16位。
    int r = sharedCount(c);
    // 公平锁:就查看队列是由有排队的,有排队的,直接告辞,进不去if,后面也不用判断(没人排队继续走)
    // 非公平锁:没有排队的,直接抢。 有排队的,但是读锁其实不需要排队,如果出现这个情况,大部分是写锁资源刚刚释放,
    // 后续Node还没有来记得拿到读锁资源,当前竞争的读线程,可以直接获取
    if (!readerShouldBlock() &&
        // 判断持有读锁的临界值是否达到
        r < MAX_COUNT &&
        // CAS修改state,对高16位进行 + 1
        compareAndSetState(c, c + SHARED_UNIT)) {
        // 省略部分代码!!!!
        return 1;
    }
    return fullTryAcquireShared(current);
}
// 非公平锁的判断
final boolean apparentlyFirstQueuedIsExclusive() {
    Node h, s;
    return (h = head) != null &&    // head为null,可以直接抢占锁资源
        (s = h.next)  != null &&    // head的next为null,可以直接抢占锁资源
        !s.isShared()         &&    // 如果排在head后面的Node,是共享锁,可以直接抢占锁资源。
        s.thread != null;           // 后面排队的thread为null,可以直接抢占锁资源
}
2
3
4
5
6
7
8
9
10
11
12
13
14
15
16
17
18
19
20
21
22
23
24
25
26
27
28
29
30
31
32
33
34
35
36
37
38
39
40
41
42
43
# 4.1.2 读锁重入流程
=============================重入操作================
前面阐述过,读锁为了记录锁重入的次数,需要让每个读线程用ThreadLocal存储重入次数
ReentrantReadWriteLock对读锁重入做了一些优化操作
============================记录重入次数的核心================
ReentrantReadWriteLock在内部对ThreadLocal做了封装,基于HoldCount的对象存储重入次数,在内部有个count属性记录,而且每个线程都是自己的ThreadLocalHoldCounter,所以可以直接对内部的count进行++操作。
=============================第一个获取读锁资源的重入次数记录方式================
第一个拿到读锁资源的线程,不需要通过ThreadLocal存储,内部提供了两个属性来记录第一个拿到读锁资源线程的信息
内部提供了firstReader记录第一个拿到读锁资源的线程,firstReaderHoldCount记录firstReader的锁重入次数
==============================最后一个获取读锁资源的重入次数记录方式================
最后一个拿到读锁资源的线程,也会缓存他的重入次数,这样++起来更方便
基于cachedHoldCounter缓存最后一个拿到锁资源现成的重入次数
==============================最后一个获取读锁资源的重入次数记录方式================
重入次数的流程执行方式:
1、判断当前线程是否是第一个拿到读锁资源的:如果是,直接将firstReader以及firstReaderHoldCount设置为当前线程的信息
2、判断当前线程是否是firstReader:如果是,直接对firstReaderHoldCount++即可。
3、跟firstReader没关系了,先获取cachedHoldCounter,判断是否是当前线程。
3.1、如果不是,获取当前线程的重入次数,将cachedHoldCounter设置为当前线程。
3.2、如果是,判断当前重入次数是否为0,重新设置当前线程的锁从入信息到readHolds(ThreadLocal)中,算是初始化操作,重入次数是0
3.3、前面两者最后都做count++
上述逻辑源码分析
protected final int tryAcquireShared(int unused) {
    Thread current = Thread.currentThread();
    int c = getState();
    if (exclusiveCount(c) != 0 &&
        getExclusiveOwnerThread() != current)
        return -1;
    int r = sharedCount(c);
    if (!readerShouldBlock() &&
        r < MAX_COUNT &&
        compareAndSetState(c, c + SHARED_UNIT)) {
        // ===============================================================
        // 判断r == 0,当前是第一个拿到读锁资源的线程
        if (r == 0) {
            // 将firstReader设置为当前线程
            firstReader = current;
            // 将count设置为1
            firstReaderHoldCount = 1;
        }
        // 判断当前线程是否是第一个获取读锁资源的线程
        else if (firstReader == current) {
            // 直接++。
            firstReaderHoldCount++;
        }
        // 到这,就说明不是第一个获取读锁资源的线程
        else {
            // 那获取最后一个拿到读锁资源的线程
            HoldCounter rh = cachedHoldCounter;
            // 判断当前线程是否是最后一个拿到读锁资源的线程
            if (rh == null || rh.tid != getThreadId(current))
                // 如果不是,设置当前线程为cachedHoldCounter
                cachedHoldCounter = rh = readHolds.get();
            // 当前线程是之前的cacheHoldCounter
            else if (rh.count == 0)
                // 将当前的重入信息设置到ThreadLocal中
                readHolds.set(rh);
            // 重入的++
            rh.count++;
        }
        // ===============================================================
        return 1;
    }
    return fullTryAcquireShared(current);
}
2
3
4
5
6
7
8
9
10
11
12
13
14
15
16
17
18
19
20
21
22
23
24
25
26
27
28
29
30
31
32
33
34
35
36
37
38
39
40
41
42
43
# 4.1.3 读锁加锁的后续逻辑fullTryAcquireShared
// tryAcquireShard方法中,如果没有拿到锁资源,走这个方法,尝试再次获取,逻辑跟上面基本一致。
final int fullTryAcquireShared(Thread current) {
    // 声明当前线程的锁重入次数
    HoldCounter rh = null;
    // 死循环
    for (;;) {
        // 再次拿到state
        int c = getState();
        // 当前如果有写锁在占用锁资源,并且不是当前线程,返回-1,走排队策略
        if (exclusiveCount(c) != 0) {
            if (getExclusiveOwnerThread() != current)
                return -1;

        }
        // 查看当前是否可以尝试竞争锁资源(公平锁和非公平锁的逻辑)
        else if (readerShouldBlock()) {
            // 无论公平还是非公平,只要进来,就代表要放到AQS队列中了,先做一波准备
            // 在处理ThreadLocal的内存泄漏问题
            if (firstReader == current) {
                // 如果当前当前线程是之前的firstReader,什么都不用做
            } else {
                // 第一次进来是null。
                if (rh == null) {
                    // 拿到最后一个获取读锁的线程
                    rh = cachedHoldCounter;
                    // 当前线程并不是cachedHoldCounter,没到拿到
                    if (rh == null || rh.tid != getThreadId(current)) {
                        // 从自己的ThreadLocal中拿到重入计数器
                        rh = readHolds.get();
                        // 如果计数器为0,说明之前没拿到过读锁资源
                        if (rh.count == 0)
                            // remove,避免内存泄漏
                            readHolds.remove();
                    }
                }
                // 前面处理完之后,直接返回-1
                if (rh.count == 0)
                    return -1;
            }
        }
        // 判断重入次数,是否超出阈值
        if (sharedCount(c) == MAX_COUNT)
            throw new Error("Maximum lock count exceeded");
        // CAS尝试获取锁资源
        if (compareAndSetState(c, c + SHARED_UNIT)) {
            if (sharedCount(c) == 0) {
                firstReader = current;
                firstReaderHoldCount = 1;
            } else if (firstReader == current) {
                firstReaderHoldCount++;
            } else {
                if (rh == null)
                    rh = cachedHoldCounter;
                if (rh == null || rh.tid != getThreadId(current))
                    rh = readHolds.get();
                else if (rh.count == 0)
                    readHolds.set(rh);
                rh.count++;
                cachedHoldCounter = rh; // cache for release
            }
            return 1;
        }
    }
}
2
3
4
5
6
7
8
9
10
11
12
13
14
15
16
17
18
19
20
21
22
23
24
25
26
27
28
29
30
31
32
33
34
35
36
37
38
39
40
41
42
43
44
45
46
47
48
49
50
51
52
53
54
55
56
57
58
59
60
61
62
63
64
# 4.1.4 读线程在AQS队列获取锁资源的后续操作
1、正常如果都是读线程来获取读锁资源,不需要使用到AQS队列的,直接CAS操作即可
2、如果写线程持有着写锁,这是读线程就需要进入到AQS队列排队,可能会有多个读线程在AQS中。
当写锁释放资源后,会唤醒head后面的读线程,当head后面的读线程拿到锁资源后,还需要查看next节点是否也是读线程在阻塞,如果是,直接唤醒
源码分析
// 读锁需要排队的操作
private void doAcquireShared(int arg) {
    // 声明Node,类型是共享锁,并且扔到AQS中排队
    final Node node = addWaiter(Node.SHARED);
    boolean failed = true;
    try {
        boolean interrupted = false;
        for (;;) {
            // 拿到上一个节点
            final Node p = node.predecessor();
            // 如果prev节点是head,直接可以执行tryAcquireShared
            if (p == head) {
                int r = tryAcquireShared(arg);
                if (r >= 0) {
                    // 拿到读锁资源后,需要做的后续处理
                    setHeadAndPropagate(node, r);
                    p.next = null; // help GC
                    if (interrupted)
                        selfInterrupt();
                    failed = false;
                    return;
                }
            }
            // 找到prev有效节点,将状态设置为-1,挂起当前线程
            if (shouldParkAfterFailedAcquire(p, node) &&
                parkAndCheckInterrupt())
                interrupted = true;
        }
    } finally {
        if (failed)
            cancelAcquire(node);
    }
}

private void setHeadAndPropagate(Node node, int propagate) {
    // 拿到head节点
    Node h = head;
    // 将当前节点设置为head节点
    setHead(node);
    // 第一个判断更多的是在信号量有处理JDK1.5 BUG的操作。
    if (propagate > 0 || h == null || h.waitStatus < 0 || (h = head) == null || h.waitStatus < 0) {
        // 拿到当前Node的next节点
        Node s = node.next;
        // 如果next节点是共享锁,直接唤醒next节点
        if (s == null || s.isShared())
            doReleaseShared();
    }
}
2
3
4
5
6
7
8
9
10
11
12
13
14
15
16
17
18
19
20
21
22
23
24
25
26
27
28
29
30
31
32
33
34
35
36
37
38
39
40
41
42
43
44
45
46
47
48
# 4.2 读锁的释放锁流程
- 处理重入以及state的值
- 唤醒后续排队的Node
源码分析
// 读锁释放锁流程
public final boolean releaseShared(int arg) {
    // tryReleaseShared:处理state的值,以及可重入的内容
    if (tryReleaseShared(arg)) {
        // AQS队列的事!
        doReleaseShared();
        return true;
    }
    return false;
}

// 1、 处理重入问题  2、 处理state
protected final boolean tryReleaseShared(int unused) {
    // 拿到当前线程
    Thread current = Thread.currentThread();
    // 如果是firstReader,直接干活,不需要ThreadLocal
    if (firstReader == current) {
        // assert firstReaderHoldCount > 0;
        if (firstReaderHoldCount == 1)
            firstReader = null;
        else
            firstReaderHoldCount--;
    }
    // 不是firstReader,从cachedHoldCounter以及ThreadLocal处理
    else {
        // 如果是cachedHoldCounter,正常--
        HoldCounter rh = cachedHoldCounter;
        // 如果不是cachedHoldCounter,从自己的ThreadLocal中拿
        if (rh == null || rh.tid != getThreadId(current))
            rh = readHolds.get();
        int count = rh.count;
        // 如果为1或者更小,当前线程就释放干净了,直接remove,避免value内存泄漏
        if (count <= 1) {
            readHolds.remove();
            // 如果已经是0,没必要再unlock,扔个异常
            if (count <= 0)
                throw unmatchedUnlockException();
        }
        // -- 走你。
        --rh.count;
    }
    for (;;) {
        // 拿到state,高16位,-1,成功后,返回state是否为0
        int c = getState();
        int nextc = c - SHARED_UNIT;
        if (compareAndSetState(c, nextc))
            return nextc == 0;
    }
}

// 唤醒AQS中排队的线程
private void doReleaseShared() {
    // 死循环
    for (;;) {
        // 拿到头
        Node h = head;
        // 说明有排队的
        if (h != null && h != tail) {
            // 拿到head的状态
            int ws = h.waitStatus;
            // 判断是否为 -1
            if (ws == Node.SIGNAL) {
                // 到这,说明后面有挂起的线程,先基于CAS将head的状态从-1,改为0
                if (!compareAndSetWaitStatus(h, Node.SIGNAL, 0))
                    continue;
                // 唤醒后续节点
                unparkSuccessor(h);
            }
            // 这里不是给读写锁准备的,在信号量里说。。。
            else if (ws == 0 && !compareAndSetWaitStatus(h, 0, Node.PROPAGATE))
                continue;
        }
        // 这里是出口
        if (h == head)
            break;
    }
}
2
3
4
5
6
7
8
9
10
11
12
13
14
15
16
17
18
19
20
21
22
23
24
25
26
27
28
29
30
31
32
33
34
35
36
37
38
39
40
41
42
43
44
45
46
47
48
49
50
51
52
53
54
55
56
57
58
59
60
61
62
63
64
65
66
67
68
69
70
71
72
73
74
75
76
77